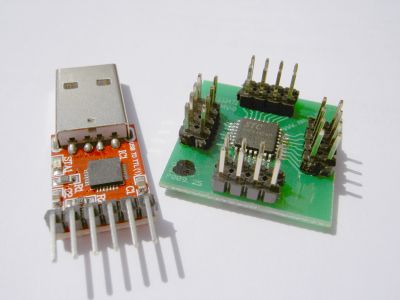
This article describes the first steps how you start programming a 8051 compatible MCU (aka C51), in this case the STC12C5412AD using a USB-to-TTL adaptor.
Why 8051/C51 ?
- very popular (you can find plenty of code examples)
- simple to program (simple register maps etc.)
- cheap
- Todays 8051 compatible MCUs have most needed integrated (flash memory, EEPROM, ADC, UART, PWM, …)
- almost nothing has changed since its beginning (same registers – the 1980’s code you find still works)
Why STC MCU?
- cheap
- easy to flash: no external programmer is required – TX/RX line is used to flash the MCU
What you need:
- STC MCU (STC12C5410AD, STC12C5412AD, STC12C5620AD, …) – here we using the LQFP-32 pins version (right chip in the picture above)
- USB-to-TTL (5V) adaptor like in the picture above (these can be found easily via eBay) – my adaptor uses the popular CP2102 USB-to-UART bridge
- Wire, adaptor board, …
- a PC
- a book about 8051 programming (STC doesn’t provide a real 8051 programming reference paper, however this isn’t needed as their MCUs are 100% compatible to the original 8051 generic MCU programming !)
Steps:
- Connect the STC MCU to the USB-to-TTL adaptor:
USB-adaptor TX <—> MCU RX
USB-adaptor RX <—> MCU TX
USB-adaptor +5V <—> MCU VCC
USB-adaptor GND <—> MCU GND
That’s too easy isn’t it? 🙂 - Download STC ISP software v4.80 (Chinese user interface) – I needed v4.80 for my MCU, newer MCUs need newer ISP versions!
- Download Keil uVision IDE and Compiler (evaluation)
- Install uVision, create a new project “Atmel AT89S52”, no startup file. Under Project options, set OSC frequency, and check “hex file” output.
- In uVision, create a new file (test1.c), and add it to the project. Write your first MCU program in this file.
- Add the corresponding STC MCU header file to your project and include it (e.g. STC12C5410AD.H or STC12C5620AD.H). They contain the port and memory definitions for your type of MCU. You can find them in the download below.
- Compile to .hex file
- Upload .hex file using the ISP software. Important: the STC MCU automatically starts reading and flashing the program via RX line when a certain sequence is sent at start up – therefore, you first need to start the ‘Download’ in the ISP software, and _after_ that turn on the MCU ! Also, both the ISP software and MCU will automatically handshake a good baud rate (e.g. if the internal 6 Mhz OSC is used, the ISP software will probe a ‘good’ baud rate, so that the MCU will start downloading).
Downloads:
stc_demo.zip
(shows how to initialize the UART, ADC and successively sends the value of ADC0 via UART to the PC)

Hello,
I arrived on your article because I try to access the bootloader of a microcontroller STC: STC15F2K60S2, by connecting USB-to-TTL on TX, RX, VCC, GND and using PUTTY software, I see no bootloader at start of the PCB.
Can you tell me how to access the bootloader STC?
Do you have a bootloader to give me?
How to transfer a new bootloader?
Thank you very much.
Hy
Were you able to read the code from MCU?
I’m trying to read CODE and FLASH from stc 12c5404ad without success.
Can you help me please?
Thanks
Thank you, very useful! Especially I am a Linux user, And usbasp is much more difficult! let me try to find out that the flasher workes with wine or not under Linux.
Now we also Have the CH552 family another even more cheaper 8051 and with USB on CHIP
Is it possible to read/download the hexfile from a STC90C516 chip?