Can we use a Google Tango phone as an add-on for DIY robotics? This blog article describes how a Google Tango phone can be used for cm-precise position estimation and how it works (btw, Google has done the hard work for you already, this article will only try to explain the magic behind it). Finally, examples of an autonomous robotic mower, a quadrotor, a wheelchair and an ISS explorer are shown.
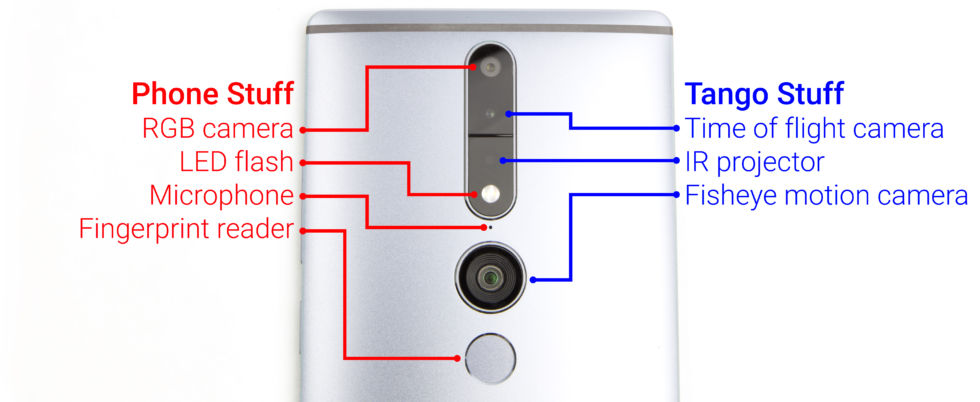
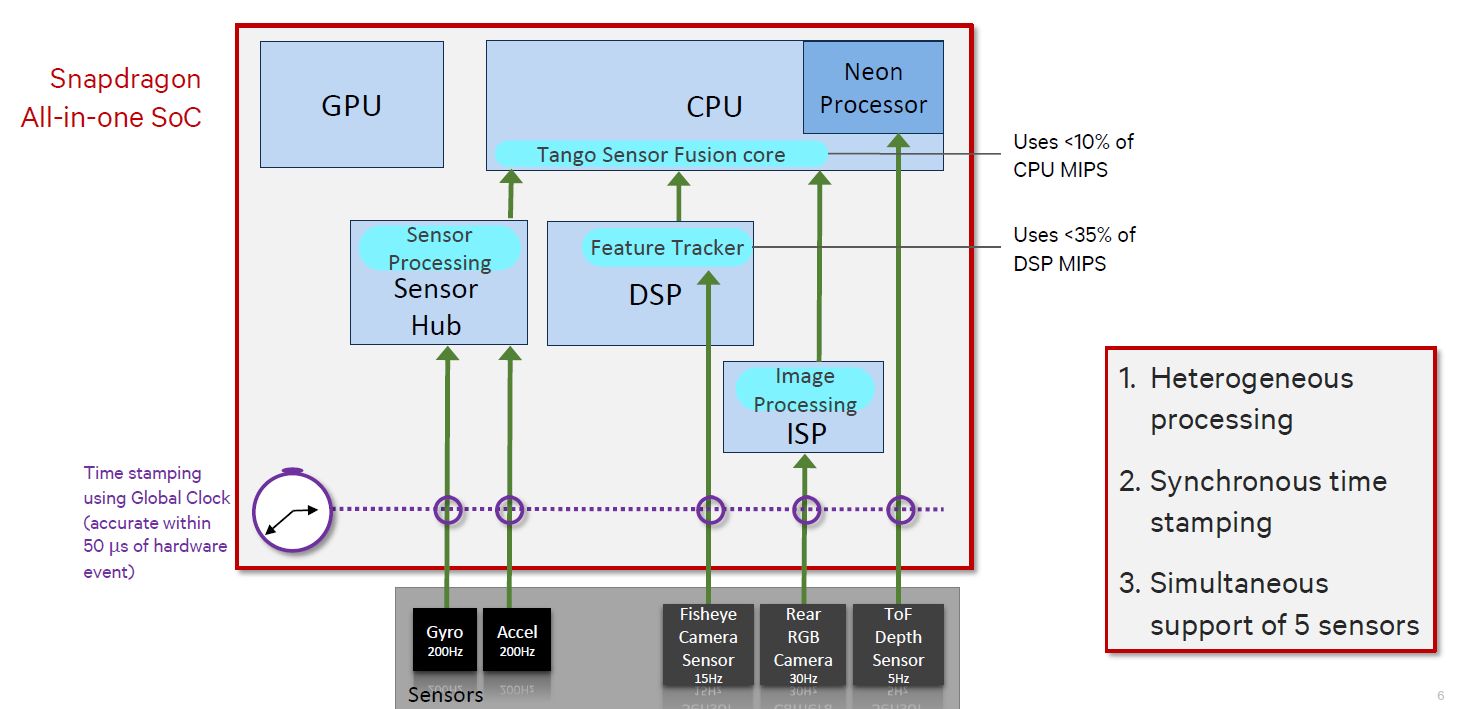
What’s inside a Tango phone
Example device: Lenovo PHAB 2 Pro (power consumption ~6.5 W)
- A global shutter fish-eye camera (~130 degree)
- An inertial sensor (IMU) consisting of an acceleration sensor and a gyro
- A 3D camera (time-of-flight depth-sensor )
Motion Tracking
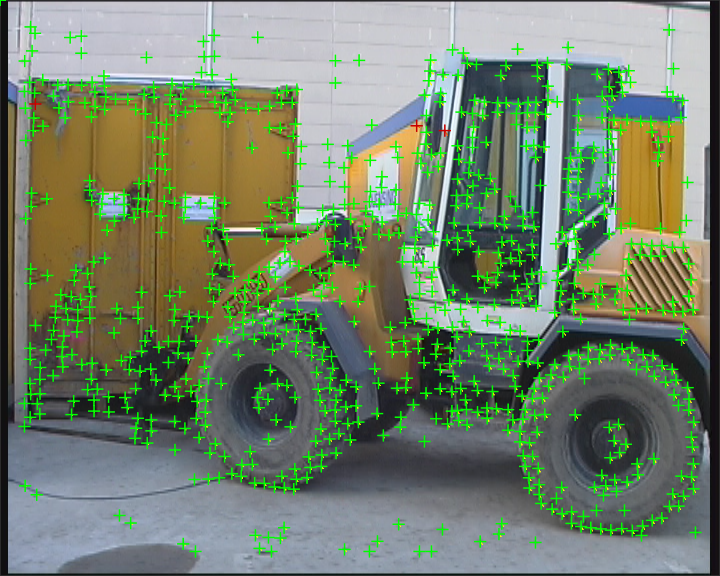
Step 1: The fish-eye camera permanently looks for (unique) high contrast points (so called ‘feature points‘) in the camera images. Each feature point is unique as neighbour points are also used to identify it. Each feature point will get an ID (number), and the same feature point found in following camera images will get the same ID.
Example image (feature points marked in green):
Example video (feature points marked in red):
Step 2: Each 3D point in the 3D world (or 3D model) is a projection onto the 2D camera plane, and so are the feature points 3D-to-2D projections of the real 3D world points, too.
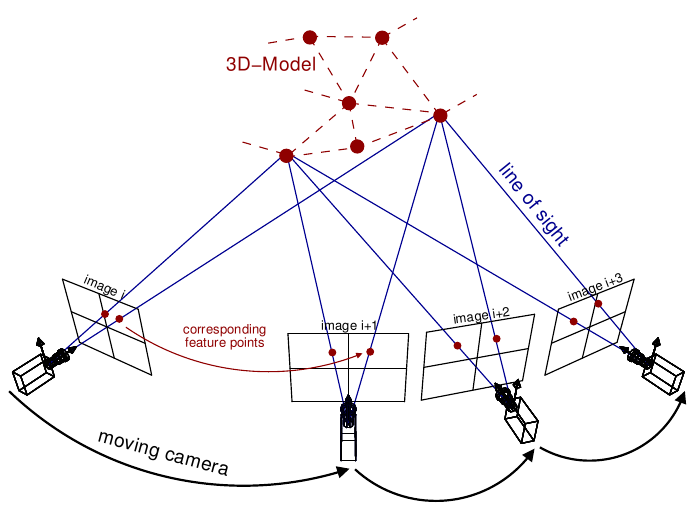
Now, if we have 2D feature points in camera image at time (i), and the same 2D feature points in camera image at time (i+1), we can compute the corresponding 3D points via triangulation. In addition, we can compute the corresponding 3D camera positions (one exception: we cannot estimate overall measurement scale – more on this below).
Sensor fusion
Camera motion (from camera image to camera image) can be either:
- a 3D translation (moving along one axis)
- a 3D rotation (rotating by one axis)
- and a combination of both
Because a single camera cannot estimate the 3D scale (cameras measure rotation only), we need another sensor to measure the missing camera scale: an IMU. By the help of an acceleration sensor and a gyro, we can compute scale and so fuse both camera and IMU measurements.
Important: The time stamps of camera and IMU must be time-synchronized (millisecond precise), so we can correctly match IMU and camera measurements.
Why fish-eye camera? The more feature points found in following images, the less the error. A fish-eye camera gives us more overlapping of the images.
Why global-shutter? A global shutter camera exposes all pixels at once – the cheaper cameras on the market use rolling shutter, and this will make it difficult to do correct camera triangulation.
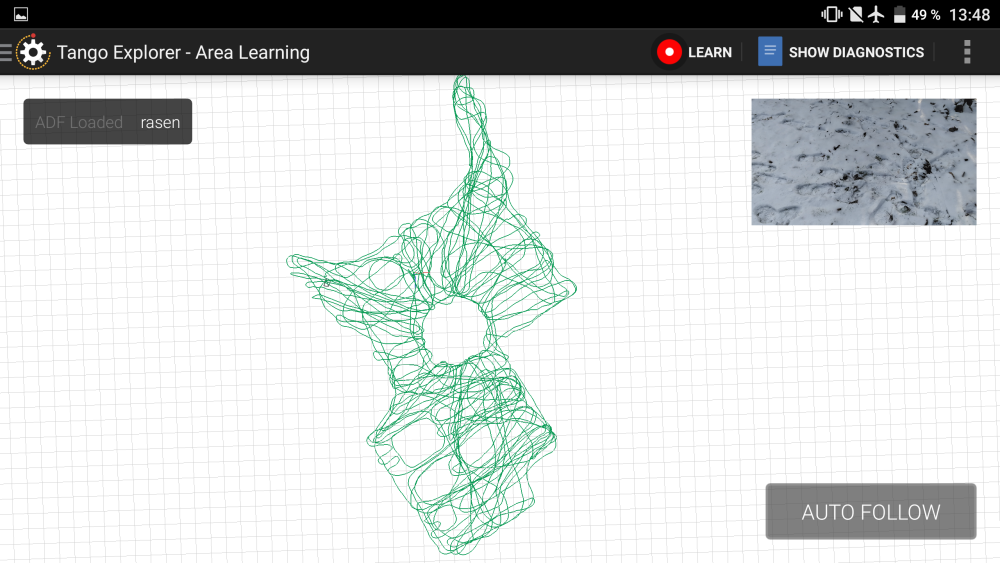
Motion tracking example session (on a lawn):
Drift-correction
During the estimation of each camera position we will make a small error (computations and sensors are not 100% precise) from image-to-image, and this will make the position to drift over time. However, if we save the feature points and the corresponding camera position (x,y,z) in a database, we can use it to recognize an already visited camera position and so correct the drift. This learning process is called ‘Area learning’ in Tango (and the database ‘Area Description File’).
How precise is this system? I made a test and measured the maximum drift (worst-case position correction) of the system in an 20x30m area (on our lawn) – result: 0.38 m. The average error is much smaller though (1-2 cm).
3D camera / depth-sensor
The 3D camera measures the depth of all camera points. Now, let’s add a touch-screen to the system. Why do we need a 3D camera at all?

Each time a user touches on the screen, we know the 2D position on the screen – The motion tracking gives us the current camera position and orientation. To get the 3D point in the world where the user touched the screen, we also need the depth-sensor. We will use these 3D points to define a perimeter (working area) for a robot mower.
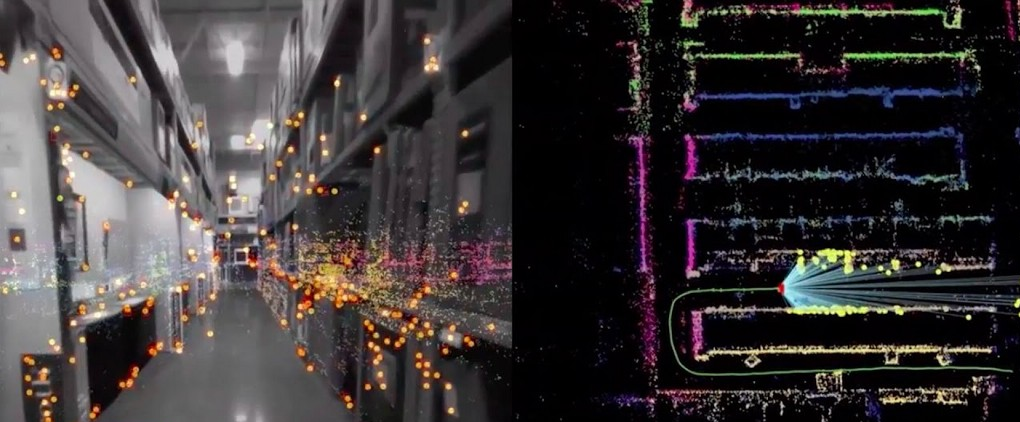
Area learning example: each time a position is recognized, the position is corrected (drift-corrected). The green perimeter (polyline) was defined using touchscreen before. During motion tracking, the perimeter is projected into the camera image.
Examples
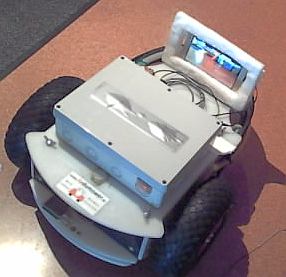
Ardumower Vision (autonomous robot mower)
This example shows how Tango position estimation can be used to control a robot mower.
Indoor example:
Outdoor example:
Outdoor localization test
Ardumower Vision – Quick Start
- Build your Ardumower: http://www.ardumower.de/index.php/en/
- Download Ardumower Vision App https://play.google.com/store/apps/details?id=de.grauonline.ardumowervision
- Flash Ardumower Sunray firmware to your Ardumower:
https://github.com/Ardumower/Sunray - In Ardumower Vision menu, choose ‘ADF->Learning->ON’, and ‘ADF->New’
- From your current position, go in a circle, so that the device sees and learns your environment
- Finally, choose ‘ADF->Save’ (and give it a name) to save the learned ADF
- Choose ‘ADF->Learning->OFF’ to turn off learning again
- Choose ‘ADF->Open’ to open your learned ADF
- Walk around until relocalization happens (‘valid’ goes to ‘1’)
- Set your perimeter points via clicking the touch screen
- Finally, save your scene (choosen ADF, perimeter points) via ‘Scene-Save’ (and give it a name).
- Connect to robot bluetooth via ‘Robot->Connect’. The following commands will be sent to robot:
a) (manual steering via phone IMU) set left/right wheel speed: ?02,left,right\n (left, right in percent: 0.0-1.0)
b) (automatic mowing) rotate robot by angle: ?08,angle,speed\n (angle in rad, speed in percent: 0.0-1.0)
c) (automatic mowing) drive forward with speed and angle: ?85,distance,angle,speed\n (angle in rad, distance in cm, speed in percent: 0.0-1.0)
For further command details, see Ardumower Sunray firmware link above.
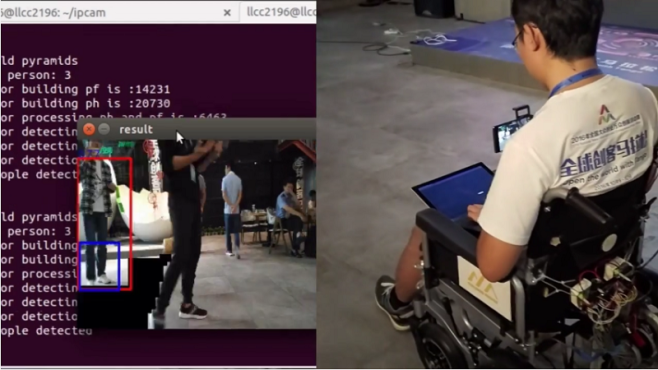
Autonomous wheelchair
Autonomous quadrotor

ISS explorer
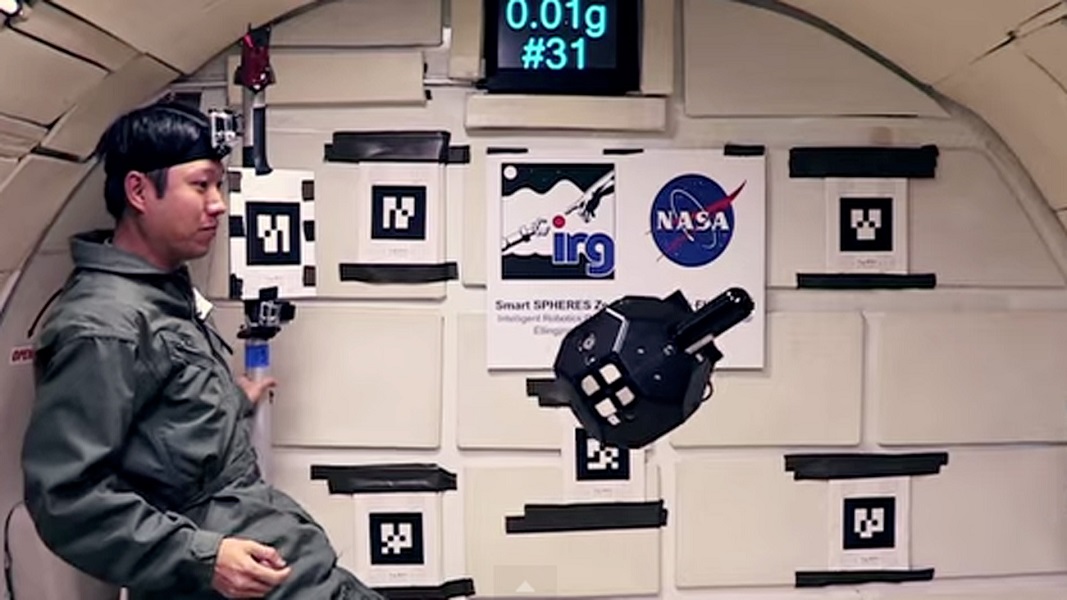
https://www.nasa.gov/content/project-tango-on-spheres
Start your own Tango project
You will see that building your first Google Tango app is not difficult at all. To get started, the best option is to try ready examples. It’s highly recommended to download the Google Tango SDK examples and try them out: https://developers.google.com/tango/
Can I just use a Tango enabled phone to develop something externally on my computer/Arduino/Raspberry? Of course, you can – there’s an App that allows you to broadcast Tango’s position data to your PC, Mac, Arduino/ESP8266, Raspberry:
TangoAnyhwere Quickstart
- Download TangoAnywhere App: https://play.google.com/store/apps/details?id=de.grauonline.tangoanywhere
- Send this this plain text (JSON) command via simple TCP/IP socket:
{“learn”: false, “adf”: “ADFname” }\n
learn: activate learning mode?
adf: ADF name - App will constantly send the pose data:
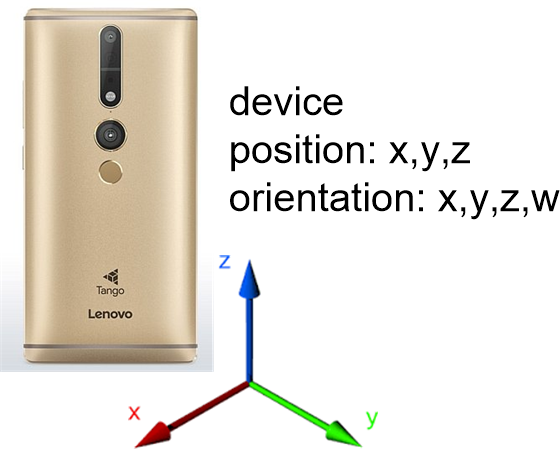
{“pos”: [x,y,z], “ori”: [x,y,z,w], “learn”: false, “relocalized”: true}\n
pos: device position
ori: device orientation
learn: learning mode active?
relocalized: position relocalized?
Python example code:
#!/usr/bin/env python
import socket
TCP_IP = '192.168.2.102'
TCP_PORT = 8080
BUFFER_SIZE = 1024
MESSAGE = '{"learn": false, "adf": "wohn"}\n'
s = socket.socket(socket.AF_INET, socket.SOCK_STREAM)
s.connect((TCP_IP, TCP_PORT))
s.send(MESSAGE)
while (True):
  data = s.recv(BUFFER_SIZE)
  print data
s.close()
Your questions/suggestions
Something wrong above or not clear enough? If so, please let me know.