This article shows how you can use OpenCV to substract (extract) a human body using (1) an ordinary RGB camera and (2) a depth camera. The ideas shown here are not restricted to human bodies and can be used to extract all kind of foreground objects from the background.
The masked output image can be useful for further processing (for example, realtime 3D skeleton tracking, body pose estimation etc.).
RGB camera
The idea is to first apply an HSV threshold filter for the binary thresholding. The mask generated by the binary threholding is then used to mask the input image.
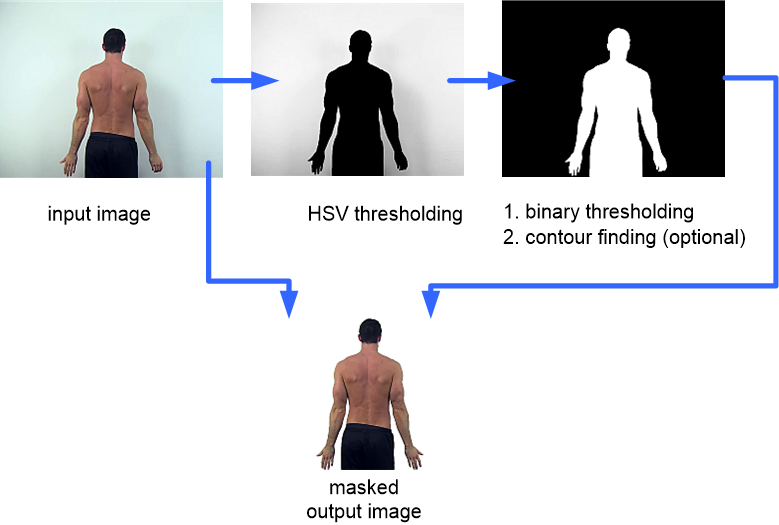
1. HSV thresholding to get rid of as much background as possible
  hsv = cv2.cvtColor(frame, cv2.COLOR_BGR2HSV)
  lower_blue = np.array([0, 0, 120])
  upper_blue = np.array([180, 38, 255])
  mask = cv2.inRange(hsv, lower_blue, upper_blue)
  result = cv2.bitwise_and(frame, frame, mask=mask)
  b, g, r = cv2.split(result)
  filter = g.copy()
2. Binary thresholding to generate a mask image of the body. Note: if you have more than one foreground object in your image, you may also need to use OpenCV’s function ‘findcontours‘ to filter out the largest contour.
ret,mask = cv2.threshold(filter,10,255, 1)
3. Masking input image by mask image
frame[ mask == 0] = 255
Depth camera
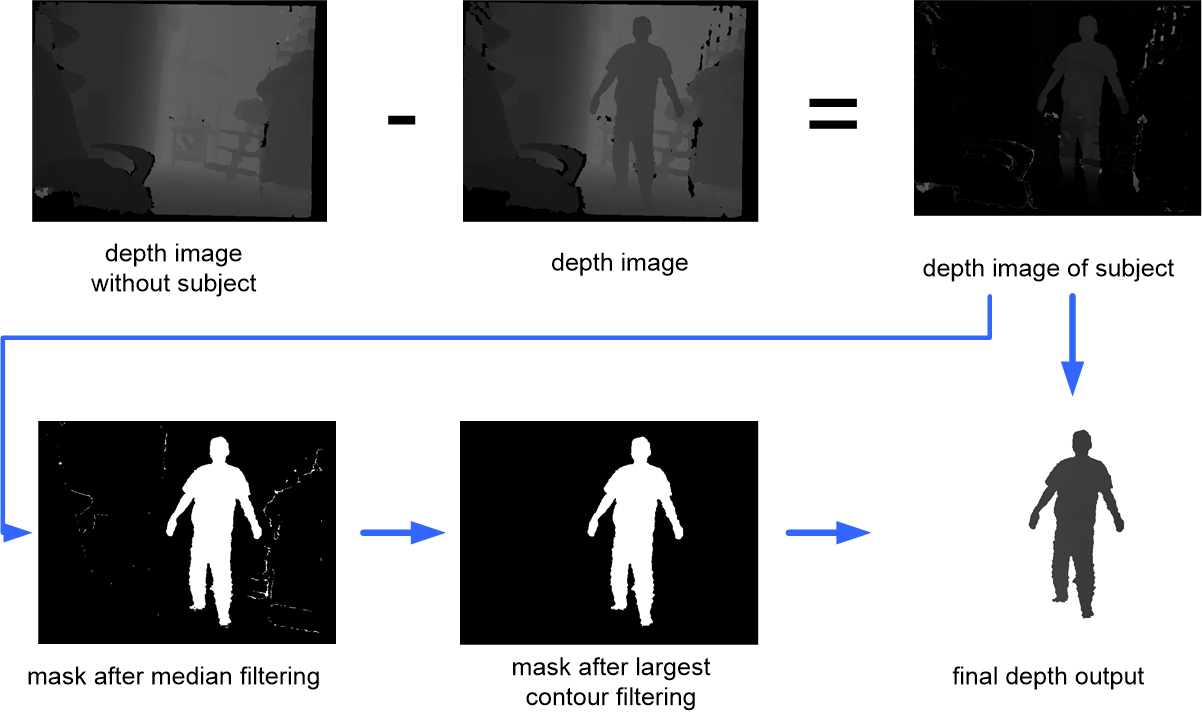
The overall workflow is shown below. The idea is to first capture a ‘background’ image once (without the subject). By substracting the depth images from this background image one can detect the body. The substracted image is further processed to filter out noise, to get the largest contour and to create a mask. Finally this mask image is used to mask the depth image.
1. Keep the background image in another image:
depth_back = depth_array.copy()
2. Substract the current depth image from the background image:
depth_diff = abs(depth_array - depth_back)
3. You’ll notice that the depth camera also has a lot of noise at the edges of obstacles (all over the image) and to filter them out we first determine the human body depth by a median filter over all depth pixels (alternative: mean filter). Then we use the median depth value of the body to filter out these noise values. We set all remaining pixels to one to get a mask image.
Some noise pixels are still there in the filtered image (have the same depth as the body). That’s no problem as we will filter them out in the next step.
median = np.median(depth_array[depth_array > 0])
mask = depth_array.copy()
mask[mask > median+0.07 ] = 0
mask[mask < median-0.07 ] = 0
mask[mask > 0] = 1
4. We compute the contours of the mask image and keep the largest contour. We draw the largest contour onto a new mask image.
_ , contours, _ = cv2.findContours(mask,2,1)
contours = sorted(contours, key=cv2.contourArea)
out_mask = np.zeros_like(depth_array)
cv2.drawContours(out_mask, [contours[-1]], -1, 255, cv2.FILLED, 1)
5. Finally, we mask the depth image by the mask image to get the body depth image:
out=depth_array.copy()
out[out_mask == 0] = 0
Further steps (example)
Now can now use the masked depth image to estimate the body parts using the work of A. Shafaei, J. J. Little. They use a deep learning network to estimate the body parts of the masked depth images. Based on the result one can compute the 3D skeleton in realtime.
![]()
A Python implementation is available here:
https://github.com/surajpaib/dense-depth-body-parts
Demo application (OpenNI and NITE):