USB Push Button
Click here to
get back to main product page.
Features
Configuration
The USB button can be configured to simulate pressing any keyboard
key. First connect the button to your computer. Then install
a serial terminal as described below:
- Windows:
- Please wait until your operating has auto-installed the Arduino Leonardo drivers on first button plugin. Click here to see a detailed manual installation description.
- Check your device manager wether there is an Arduino Leonardo device with an exclamation mark (=no driver found). If this is the case, please download and install the Arduino IDE manually and afterward proceed with manual installation as described in point 1.
- Download and extract CoolTermWin.zip
(Windows)
- Start CoolTerm.exe, choose "use defaults", then click on 'Options', choose the last COM port in the list and baud
rate 115200 and click on 'Connect' and confirm with 'Ok'. Then type "h;" in the terminal window. If there is no reaction, choose another COM port in options and retry.
Mac:
- Open terminal and enter: sudo screen
/dev/tty.usbmodemHIDA1 (type "screen /dev/tty." and
then TAB key to see the connected tty pushbutton devices).
- If the GNU screen does not work for you, download CoolTermMac.zip (Mac)
- Start CoolTerm, click on 'Options', choose the COM port and baud
rate 115200 and click on 'Connect'.
Linux:
- Open terminal and enter: sudo screen /dev/ttyACM0
(type screen /dev/ttyA" and then TAB key).
- If the screen command is not installed, type: "sudo
apt-get install screen" for a common debian based linux
distribution (like Ubuntu)
- If the GNU screen does not work for you, download CoolTermLinux.zip
(Linux)
- Start CoolTerm, click on 'Options', choose COM port and baud
rate 115200 and click on 'Connect'.

After clicking Connect, send h; to the button
for help. Every command string sent to the button must be transmitted with a semicolon.
After sending "h;" to the button, the firmware should appear as follows
(If it does not appear, check your serial connection/ choose another COM port):
 It is recommended to maximize the Terminal-Window to get a better view of the text output.
Keyboard commands
- In the first example, we will simulate pressing the key 'a' on
the keyboard. As you can see in this keyboard
codes list, the keyboard code for key 'a' is decimal 97
(or hexadecimal 0x61).
Note:
for all codes please refer to the HID usage table p.53ff.
If you want to use the codes from the HID usage, table you need
to bitwise-OR the code with 0x4000.
The button uses a command list/table with rows that it will
execute one after the other. In the example command list below,
only one command (idx 0) has been defined for the state
'PC-is-ON' and no commands have been defined for the state
'PC-is-OFF'. The command (cmd) is what type of device
action to perform:
1=system key, 2=keyboard, 3=type string, 4=consumer key,
5=delay in milliseconds, 6=delay in seconds, 7=change list
index, 8=Gamepad Key, 9=Gamepad Axis, 10=Gamepad Rotation Axis,
11=Gamepad direction pad.
A maximum of three comma separated values follow the command,
which define the key to trigger (data1=97 as per keyboard
codes above for key 'a').
Example for the result command list:
      Commands to execute when the PC-is-OFF (that is state 0):
      idx 0:
      idx 1:
      idx 2:
      Commands to execute when the PC-is-ON (that is state 1):
      idx 0:  cmd=2  data1=97  data2=0  data3=0
      idx 1:
      idx 2:
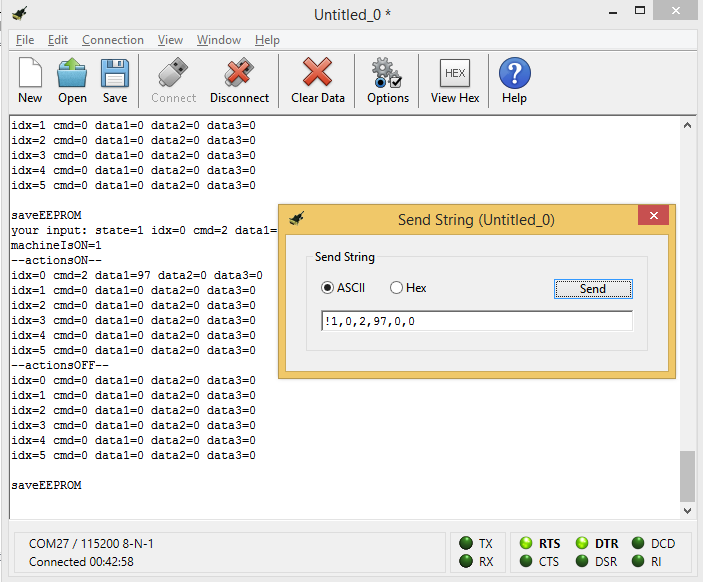
Now let's program this command list:
First clean the list number 1 with c1;.
Then enter the following line below:
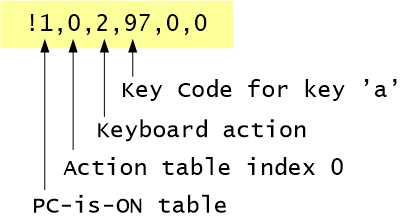
!1,0,2,97,0,0;
!=program, 1=list number 1, 0=list row number 0, 2=execute
keyboard command, 97=keyboard keycode, 0,0 = zero padding
NOTE: You can send keyboard codes in either decimal (e.g. 97) or
hexadecimal notation (e.g. 0x61 hexadecimal = 97 decimal).
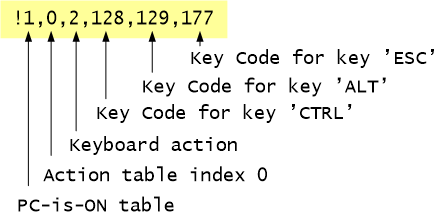
Sending more than one key:
NOTE: You can send up to 3 keys using one single command -
example for sending CTRL+ALT+ESC:
!1,0,2,0x2000,0x2002,0x4029;
!=program, 1=list number 1, 0=list row number 0, 2=execute
keyboard command, 0x2000=left CTRL modifier code, 0x2002=left
ALT modifier code, 0x4029=ESC code
NOTE: After a rows in a list are executed, all pressed keys are
automatically released.
If you explicitely want to release a key directly after
pressing, you have to bitwise-OR it with 0x8000:
Open calc in Windows and set the calculator mode to
'programmer'. Then i.e. enter 4029 for ESC, press 'OR' and enter
'8000'. The result is 'C029'.
=> The ESC code with immediately key release you can use as
data is 0xC029.
If you add a single 0x8000, all previously pressed keys from a
command are released If you add a single 0xffff, all previously
pressed key from all commands executed are released. The single
0xffff is implicitely auto-executed at the list end/ does not
need to be added there.
- You can also delete a single row in the list. I.e. to delete
any commands at idx=1:
!1,1,0,0,0,0;
After sending the line, the firmware will respond with the
output of the current command lists.

The command list number 1 is for state 'PC-is-ON', and command
list number 0 is for state 'PC-is-OFF'.
IMPORTANT: If you have programmed your command lists and
you want to store it permanently, you have to store it to the
internal FLASH memory by typing s; in the terminal.
Further keyboard examples:
- In the second example, we will simulate pressing the ENTER
key on the keyboard. As you can see in this keyboard codes list, the key code for
ENTER is 0x4028. Enter this line to simulate the key:
!1,0,2,0x4028,0,0;
- In the third example, we will simulate ...
A) pressing the system sleep key on the keyboard when the PC is
ON, and
B) pressing the system wakup key on the keyboard when the PC is
OFF.
As you can see in this keyboard codes
list, the system key code for sleep is 0x82 and for
wakekup it is 0x83. Use this line to set the sleep command for
PC-is-ON:
!1,0,1,0x82,0,0;
And use this line to set the wakeup command for PC-is-OFF:
!0,0,1,0x83,0,0;
Note that we used a system key (cmd=1) this time and not an
ordinay keyboard code (cmd=2).
More examples:
- Windows/Apple OS Menu key:
!1,0,2,0x2003,0,0;
- toggle mute/unmute sound:
!1,0,4,0xE2,0,0;
- toggle between desktop/last application (Windows Key+D):
!1,0,2,0x2003,100,0;
- ACPI Sleep/Wake (for Windows and Linux):
!1,0,1,0x82,0,0; !1,1,4,0x32,0,0; !0,0,1,0x83,0,0;
- Write string "Approved":
str0=Approved; !1,0,3,0,0,0;
- open WindowsMediaPlayer and play a video: Windowskey+r ;
500ms delay ; enter string "wmplayer.exe d:\IMG_3365.MOV" ;
ENTER
!1,0,2,0x2003,0x15,0x8000; !1,1,5,500,0,0; str1=wmplayer.exe d:\IMG_3365.MOV; !1,2,3,1,0,0; !1,3,2,0x4028,0,0;
the following customer button trigger actions shall only restart
the video (Key-combination CTRL+p in WindowsMediaPlayer).
Therefore we have to change the execution list index once:
!1,4,7,2;
=> list=1, Idx=4, Command=7 (change current list index), new
list=2
Now list number 2 is the standard execution list and there we
add at idx=0 the key press for 'CTRL+p + release all previous
command keys':
!2,0,2,0x2000,112,0x8000;
=> list=2, idx=0, command=2 (Keyboard), 0x2000 for CTRL, 112
for p, 0x8000=release all previous command keys
The above WindowsMediaplayer programming is typically used for
customer video demonstrations on exhibitions.
NOTE: Bitwise OR with 0x8000 (32768) signalizes to release the
key immediately after pressing it. Single 0x8000 releases all keys
of the last action. Single 0xffff=releases all actions in
list/table. All permanently pressed keys/actions are auto-released
when the whole action list has been executed.
Important: If the buttons operates properly do not forget to
store the settings with the store-command "s;"
Key-Repeat on Button-Hold
The button is pre-configured to fire any list action only once it is
pressed. From firmware version >=2.1.3 it is possible to a setup
a repeat-on-hold-function for each physical pin connected to the
internal USB module.
Physically the Normally-Closed-button-switch (NC button) is
connected to software pin18 (printed as A0 on internal USB module)
and the Normally-Open-button-switch (NO button) is connected to
software pin19 (printed as A1 on internal USB module).
The default configuration you see by sending the ask-config-command
"?;" is:
...
---btnPins---
>idx:0>pin:18>treshold:500>mode:INPUT_PULLUP(2)>startListTrigger:-1>startListRepeat:-1>startListRelease:-1>repeatDelay:600>bitflags:TRIG_HIGH|RELEASED|LASTLVL_L
>idx:1>pin:19>treshold:500>mode:INPUT_PULLUP(2)>startListTrigger:1>startListRepeat:-1>startListRelease:-1>repeatDelay:600>bitflags:TRIG_LOW|RELEASED|LASTLVL_H
...
The startListTrigger number shows the list number which is called
when the button has been just pressed.
The startListRepeat number shows the list number which is called
when the button is on hold/repeat.
The startListRelease number shows the list number which is called
when the button is released.
By default the NC button (pin 19) is completely disabled, as all
startListXXXX values are -1.
The NO button (pin18) is enabled for startListTrigger=1. This
means there is only list number 1 executed when the button is
triggered for the first time. There is no list executed on hold or
button release.
You may enter now the serial command: @1,19,2,0,1,1,-1,600,500;
The output is:
...
btn set: listidx=1
>idx:1>pin:19>treshold:500>mode:INPUT_PULLUP(2)>startListTrigger:1>startListRepeat:1>startListRelease:-1>repeatDelay:600>bitflags:TRIG_LOW|RELEASED|LASTLVL_L
...
Now the startListRepeat is set to 1 too (and startListTrigger is
still 1) => On first button trigger as well as on repeat
now list number 1 is executed.
If you need a faster repetition the repeatDelay variable
(default=600ms) must be lowered (here to 100ms):
@1,19,2,0,1,1,-1,100,500;
If you want to revert your changes back to non-repetition mode,
please enter the following command: @1,19,2,0,1,-1,-1,600,500;
Do not forget to save your changes with the save command: s;
Keyboard layout
The keyboard layout is 'English' by default. If you want to use
another keyboard layout, you have to enter the following command
in terminal (and save with 's;'):
l1; for German Windows CP1252 keyboard layout.
l0; for German DOS keyboard layout.
l2; for English keyboard layout
More keyboard layouts can bee added on request.
Firmware/ Factory settings
Please download the recent firmware
here. After download unzip the file, attach the button
and execute "upload.bat".
Note: Your settings will not be overwritten on firmware update. You can connect the button to a serial terminal as described above and type in "factory;" to reset your button to factory settings.
The factory settings setup your button function to a single "ENTER" key without repitition on hold.

 It is recommended to maximize the Terminal-Window to get a better view of the text output.


