
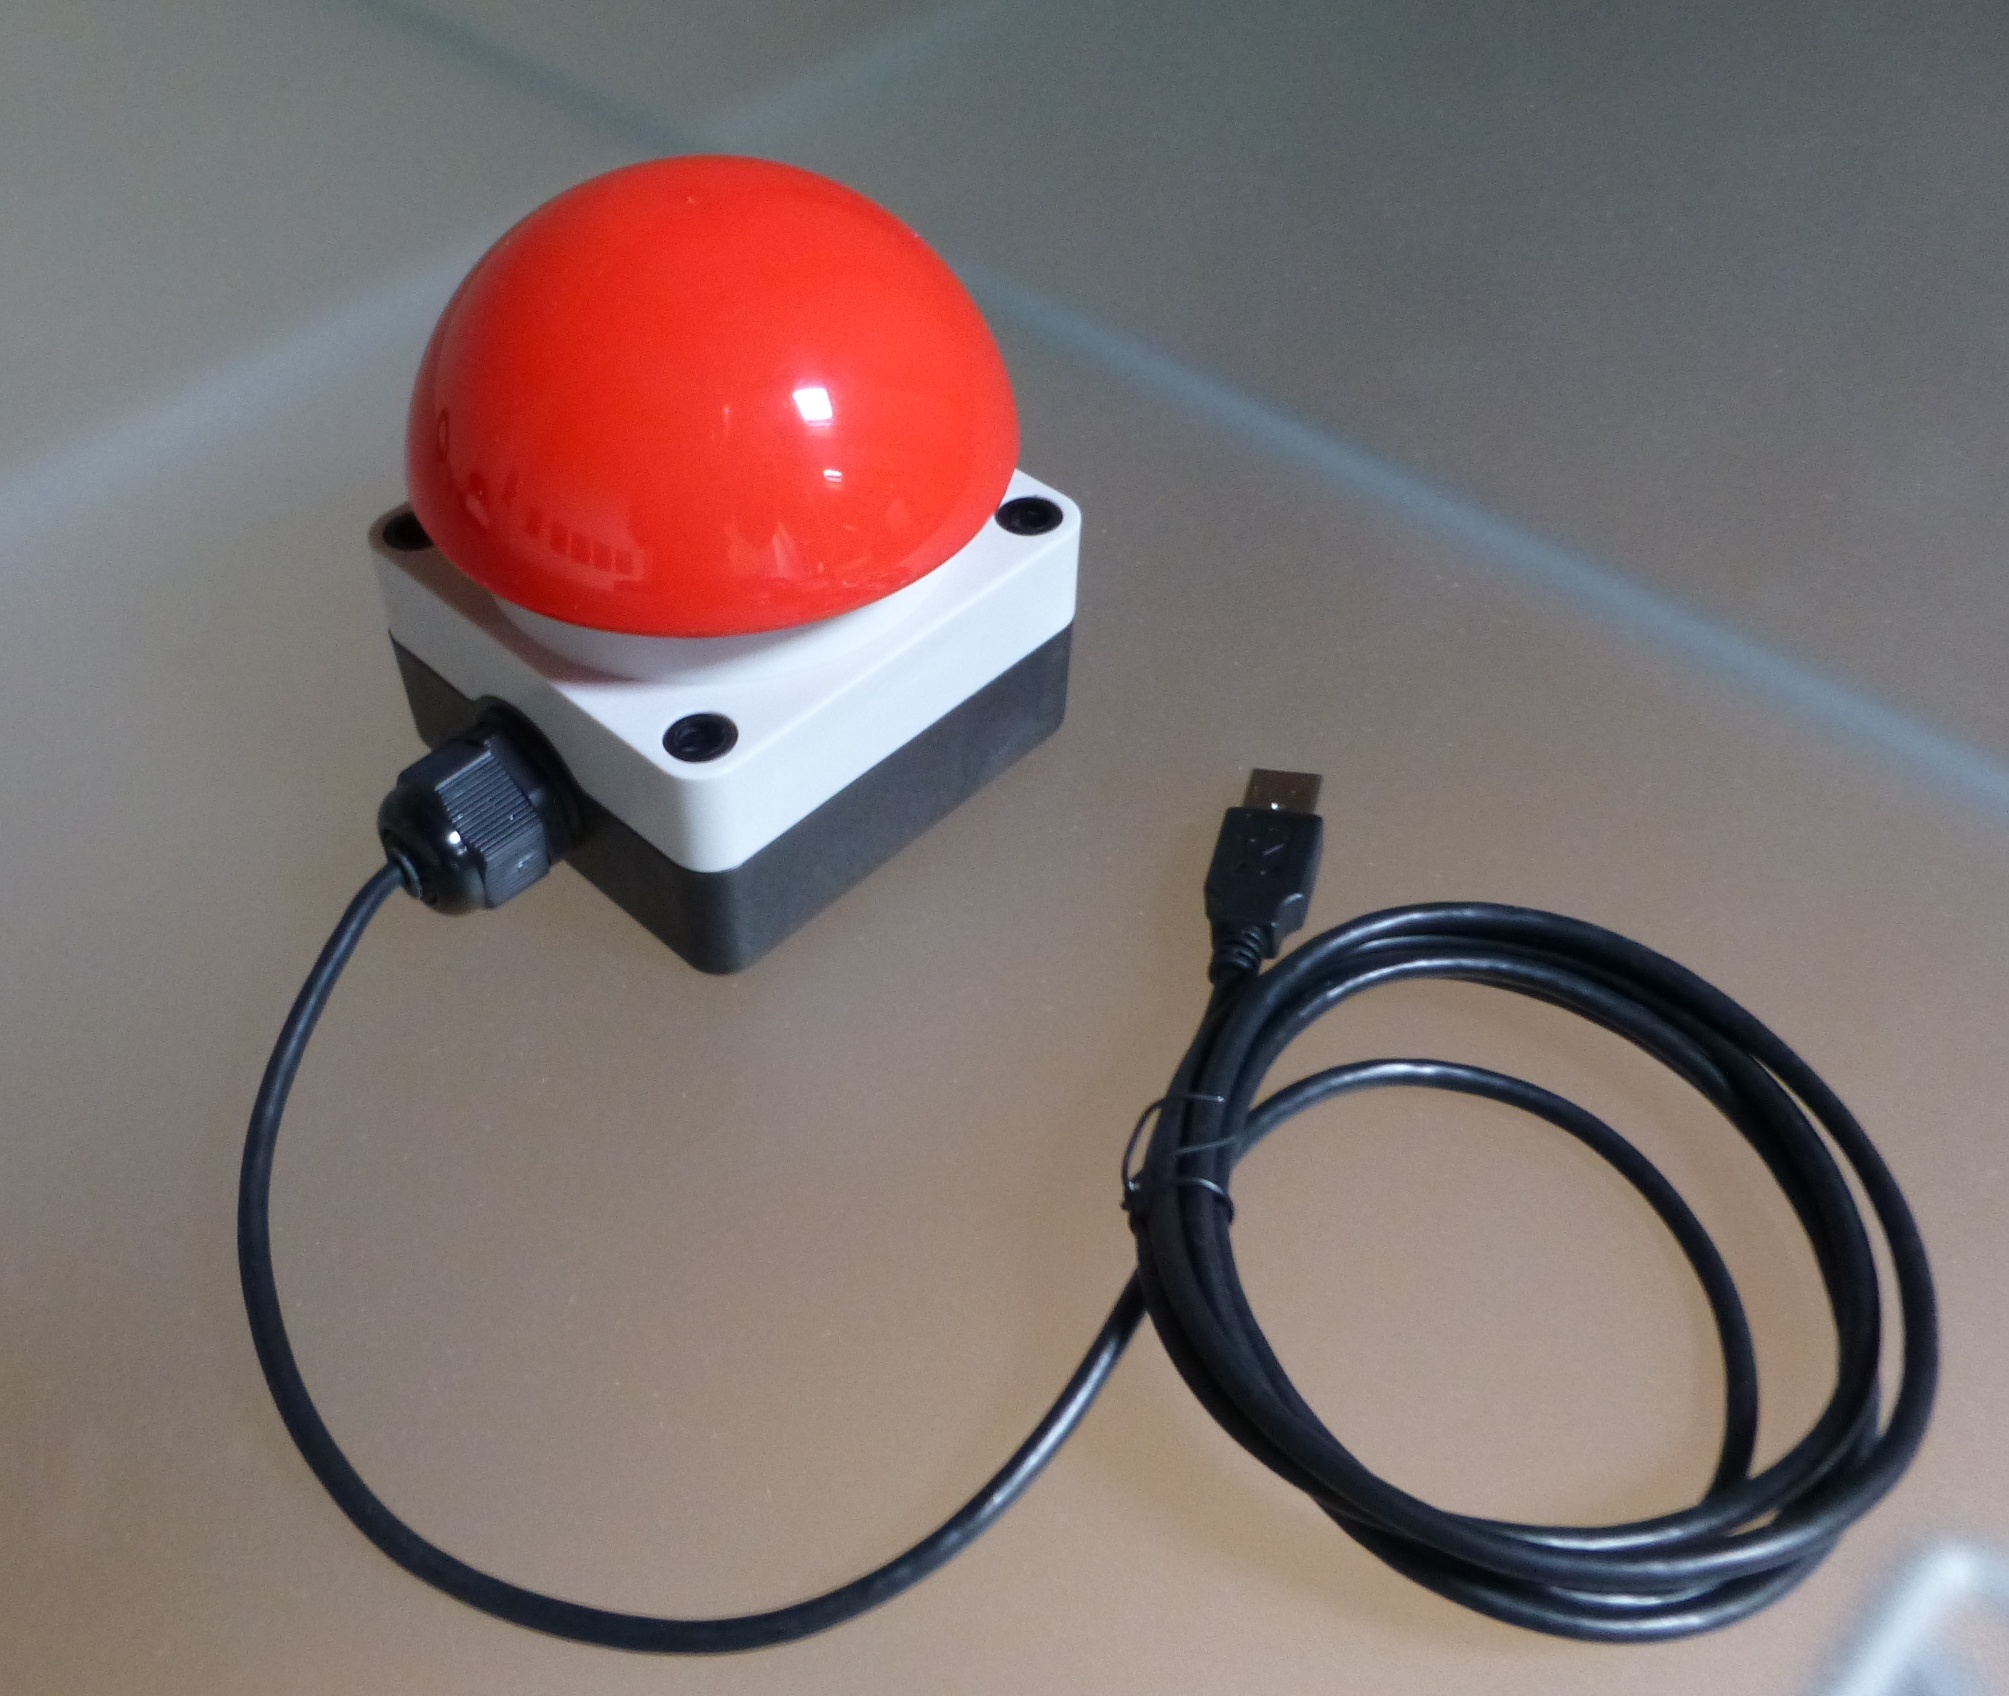
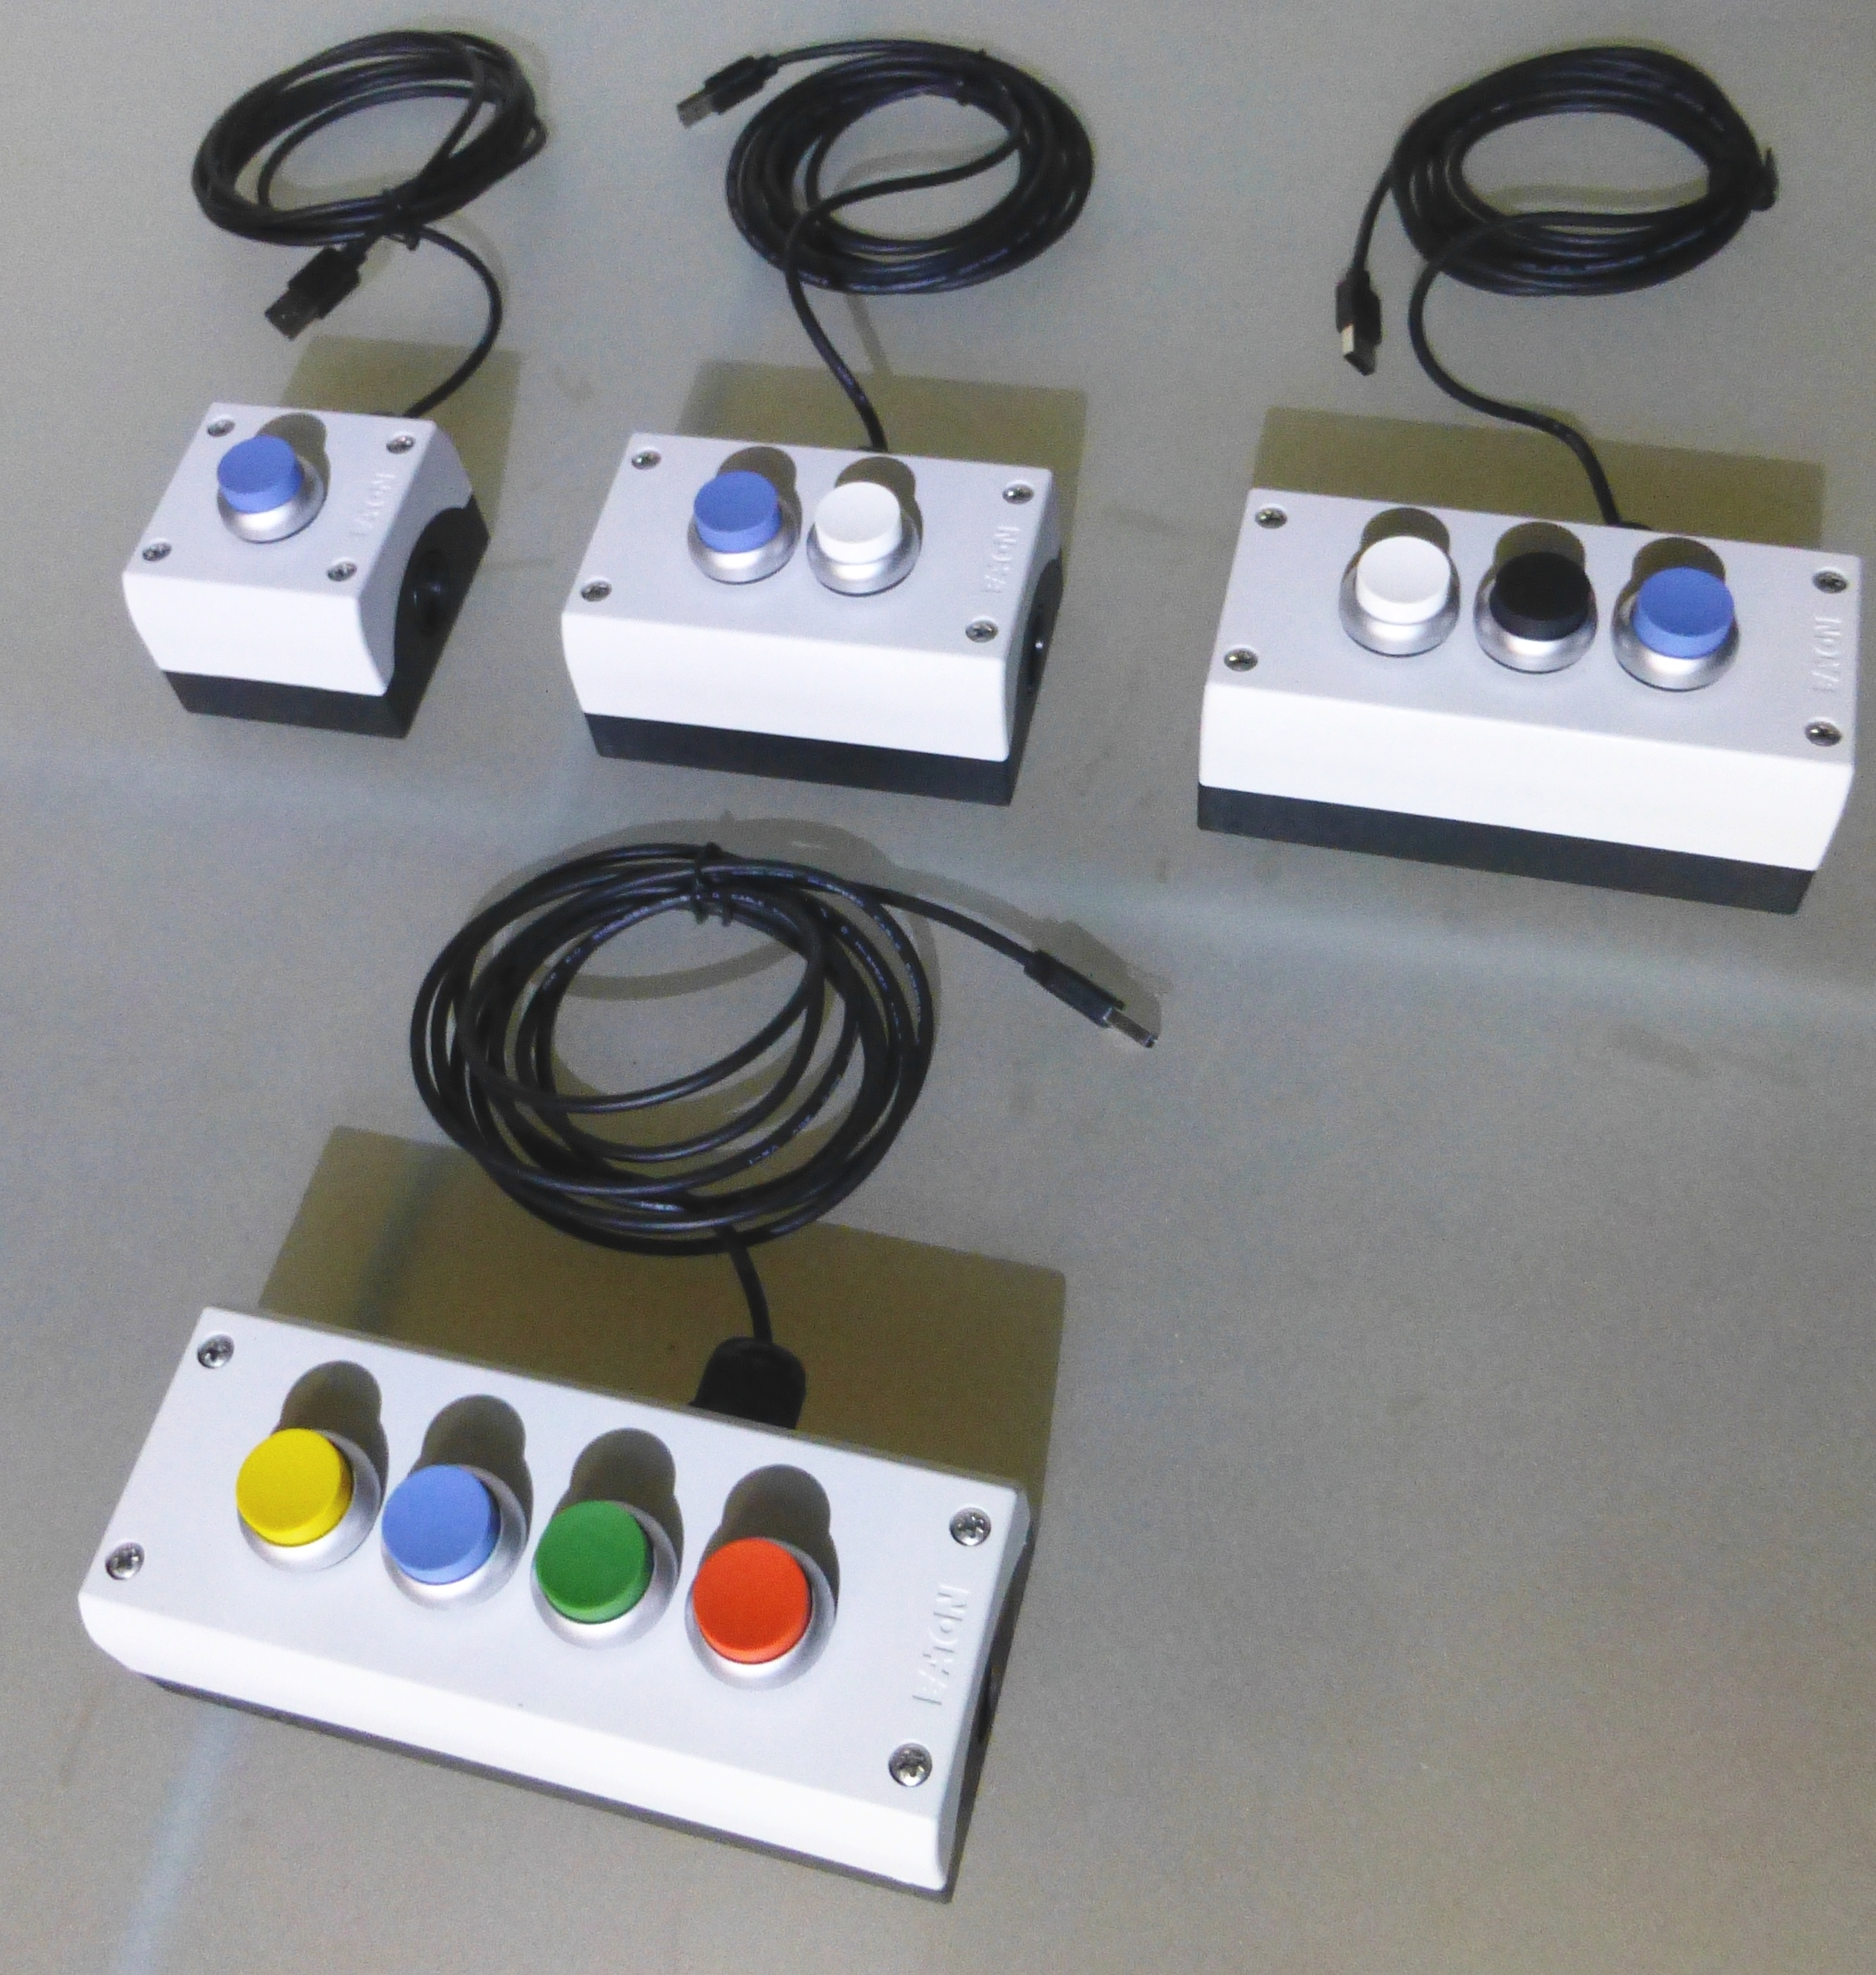
USB Pushbutton Buzzer (PBT-Series) / USB Pushbox (PBL-Series) – Manual
Contents
Install driver for programming
First connect the button to your computer. Then lay in the driver CD and wait 3 minutes to let the operating system automatically install the serial device drivers. After this proceed as follows: Windows:- Open the control panel -> device manager. If you see an ‘Arduino Leonardo’ device in the section ‘Ports (COM & LPT)’ without exclamation mark, the driver installation is completed.
- In any other case please download and install the Arduino IDE. Then check the device manager again.
- Open terminal and enter: sudo screen /dev/tty.usbmodemHIDA1 (type “screen /dev/tty.” and then TAB key to see the connected tty pushbutton devices).
- Open terminal and enter: sudo screen
- If the screen command is not found, type: “sudo apt-get install screen” for a common debian based linux distribution (like Ubuntu). If the screen has started properly, type “exit” to get back to terminal.
- Then open the serial device with: sudo screen /dev/ttyACM0 (type screen /dev/ttyA” and then TAB key to see all pushbutton serial devices).
Connecting with serial terminal
Windows:- Download CoolTermWin.zip (Windows)
- Start CoolTerm, click on ‘Options’, choose ‘Serial port’, select the last COM-port in the list and baud rate 115200 and click on ‘Ok’, then ‘Connect’. If the connection attempt fails, please choose another serial-port in the options list and try to connect with 115200 baud.
- Open terminal and enter: sudo screen /dev/tty.usbmodemCHIDA1 (type “screen /dev/tty.” and then TAB key to see the connected tty pushbutton devices).
- If the GNU screen has not enough comfort for your, you can download CoolTermMac.zip (Mac)
- Start CoolTerm, click on ‘Options’, choose serial-port = usbmodemCHIDA1 and baud rate 115200 and click on ‘Connect’.
- Open terminal and enter: sudo screen /dev/ttyACM0 (type screen /dev/ttyA” and then TAB key).
- If the GNU screen does not work for you, download CoolTermLinux.zip (Linux)
- Start CoolTerm, click on ‘Options’, choose serial-port and baud rate 115200 and click on ‘Connect’.
Quick start: Get some help
The button is configured via serial commands. You enter a command into the serial terminal, and send it to the push button by typing a ‘;’ (semicolon). You can use several commands in one line, each separated with semicolon. Connect with 115200 baud and type the help screen command: h; Now you should see the following screen (Note: Maximize your terminal window for a better view): Grau GmbH Hardware&Software Solutions – HID Pushbutton Version 2.1.7 – 15.03.2019 –Serial commands– ?; –> show all command- and string lists s; / save; –> save all lists to EEPROM h; / help; –> show this help factory; –> reset to factory settings (includes saving to EEPROM) e1; / e0; –> echo on/off c0;..c7; –> clear command list no. 0-7 bsp=xxx; –> set default button state polling interval in ms (default=100) l0;..l2; –> keyboard layout 0-2: 0=GERMAN_LATIN1, 1=GERMAN_CP1252, 2=ENGLISH str0=MyString; –> store string number !1,0,x,x,x,x; –> set single command at index 0 in command list number 1 (default list) cmd syntax: ![commandListNo],[index],[command],[data1],[data2],[data3] …..Command row and command list
Enter your first “command row” into the terminal window: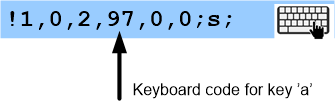 The keycode for the key ‘a’ is 97. To use other keys look for your keycode at this page.
Now press the push button to verify that the key ‘a’ is simulated by a test-press on the button.
The explaination of the “command row” above is as follows:
The keycode for the key ‘a’ is 97. To use other keys look for your keycode at this page.
Now press the push button to verify that the key ‘a’ is simulated by a test-press on the button.
The explaination of the “command row” above is as follows:
- ! = Attention – I want to program a “command row”, which is a single row/entry in a command list.
- 1 = I want to program command list number 1 (which is the default execution list). You can program command list 0..7. Each list can contain up to 8 execution command rows (indexed from 0..7). If the button is pressed all rows in the command list are executed from index 0 to 7 (if they contain any valid command rows).
- 0 = In this command list I want to program command row/index number 0 (=the first one)
- 2 = I want to program a HID-KEYBOARD-KEY command. Other command types are shown below.
- 97 = I want show ASCII char 97. A complete list of all ASCII characters with their decimal/hex codes is here. Note that the button accepts decimal (97) as well as the hex value (0x61) number format. Short explaination how to test decimal char 97: Open an editor (i.e. NOTEPAD in Windows; or a terminal in Linux). Then be sure that your keyboard NUM-LOCK mode is ON: Type 8 on the numerical keypad on the right side of your keyboard. If an 8 is shown, your keyboard NUM-LOCK is on. Else hit the NUM-LOCK key and try again. Then hold the left ALT-Key, type 9 7 on your keypad and release ALT. The result should be that an “a” is shown.
- 0,0 = zero padding/ no further keys shall be pressed.
- ; = command row completed => let the button process and verify your given command row.
- s; = Save the current settings/programming to EEPROM (=internal permanent flash memory).
- A command list is executed on button actuation. By default command list 1 is executed.
- A command list consists of up to 8 command rows. You can see all programmed command lists by typing ?;
- A complete command row ALWAYS consists of 6 values, separated by commas and is directly entered via serial terminal.
- A command row is completed and will be sent to the button by typing a semicolon “;” in the serial terminal.
- All indexes for any list begin with 0. Meaning: the first row in a command list has number 0, the second number 1, etc.
Command row syntax:
![COMMAND_LIST_NUMBER], [EXEC_ROW_INDEX], [COMMAND_TYPE], [DATA1], [DATA2], [DATA3];- COMMAND_LIST_NUMBER: 0..7 1 = default execution on button press; 0 = execution if computer is in standby ; 2..7 = user defined
- ROW_INDEX: 0..7 ; the programmed rows containing a valid command will be executed successively from 0 to 7.
- COMMAND_TYPE: 0..7 0 = do nothing, 1 = HID_SYSTEM-KEY command. See: key-code list. 2 = KEYBOARD-KEY / the normal keyboard 3 = TYPE_STRING / type whole words/sentences 4 = HID_CONSUMER-KEY command. See: key-code list. 5 = DELAY_MS / delay milliseconds, 6 = DELAY_S / delay seconds, 7 = SET_CURR_LISTIDX / set current command list index 8 = MOUSE / set mouse cursor position and (optional) click
- DATA1..DATA3: 0..65535 Note: DATA1 is only used for COMMAND_TYPE=3, 5, 6, 7 => this means DATA2, DATA3 are ignored for these COMMAND_TYPES.
Keystroke hold and release
By default the button always holds the keystrokes (=data values) given in a command row. This means if you program the key-data values 97,98,99, the keys “a”, “b”, “c” will be pressed in parallel. First after a command list has been completely executed all keystrokes will be auto-released. If you want to release a keystroke immediately after press, put a “0x8000” after your key-data value. I.e. “!1,0,2,97,0×8000,0; !1,1,2,98,0×8000,0; !1,2,2,99,0×8000,0; s;” will press the keys “a”, “b”, “c” one after another. For specialists: You can also binary-OR your key-data value with 0x8000. Use Windows Calculator in programmer-mode. I.e. for decimal value 97 you type in Windows CALC: 97, you see HEX: 61 (=0x61). Now press “OR”, then type “8000” and “=”. The result is 8061. So instead of 97, you program 0x8061 as a key-data value and the key will be released immediately after press. If you want to release all keys and actions immediately, you can also execute an “autoRelease” with the data data value “0xFFFF”. The button execute this autoRelease at every list end by default. However you can turn of the autoRelease at the command list end by setting bit7 (128) in the button pin configuration (please see below in the chapter ‘Physical pin configruation “@…” – command details’).Clear whole command lists
With “c0;”..”c7;” you can clear a whole command list (all rows). If you type “c1;” all 8 rows in command list number 1 will be cleared. Note: If you do not save your changes with “s;”, you can undo your clear command by simply un- and replugging the USB connector.Deleting single command rows
Commands in a row no longer needed can be deleted by overwriting the row with zeros. Example delete the forth row in action list number 1: !1,3,0,0,0,0; => (row number 3 as all lists start with index 0)Parallel key-strokes
You can simulate up to 6 parallel key-strokes within one or more command rows: for example CTRL+SHIFT+ESC (=open taskmanager shortcut in Windows): !1,0,2,0×2000,0x2001,0x4029; Note: 0x2000, 0x2001, 0x4029 are a hexadecimal-numbers. The heading 0x stands for the hex-number format which are easier for binary operations and shown in the keycode list. Open a calculator (i.e. Windows calc) and set it to ‘programmer’ mode. Now you can enter hex values and convert them to decimal values and vice versa. The push button can be programmed with decimals as well as hex numbers. The keycodes 0x2000, 0x2001, 0x4029 are listed in the keycode list. All three keys are pressed simultaneously and then auto-released at the end of the command list. If you want to press more keys, you can easily add a second command row: For instance: CTRL+SHIFT+ALT+BACKSPACE c1; !1,0,2,0×2000,0x2001,0x2002; !1,1,2,0x402A,0x8000,0; 0x8000 is the code for key-release, we could omit it, as the keys will be auto-released on command list end. However in this example we can add append more commands in row index 2 without getting disturbed by the keystrokes from row 0 and row 1Show all lists/get the complete configuration: ?;
Type the “show all lists/ask config”-command : ?; You will receive an answer screen similiar to this example: –VARS– isON=1 echo=1 currListIdx=1 bsp=100 soloBtnIdx=-1 keyb_layout: 1 – GERMAN_KEYB_LAYOUT_WINDOWS_CP1252 –BTNPINS– >idx:0>pin:18>treshold:500>mode:INPUT_PULLUP(2)>listTrigger:-1>listRepeat:-1>listRelease:-1> repeatDelay:400>bitflags:33|TRIG_HIGH|RELEASED|LASTLVL_L|SOLOBTN >idx:1>pin:19>treshold:500>mode:INPUT_PULLUP(2)>listTrigger:127>listRepeat:-1>listRelease:-1> repeatDelay:400>bitflags:16|TRIG_LOW|RELEASED|LASTLVL_H >idx:2>pin:20>treshold:500>mode:INPUT_PULLUP(2)>listTrigger:-1>listRepeat:-1>listRelease:-1> repeatDelay:400>bitflags:48|TRIG_LOW|RELEASED|LASTLVL_H|SOLOBTN >idx:3>pin:21>treshold:500>mode:INPUT_PULLUP(2)>listTrigger:-1>listRepeat:-1>listRelease:-1> repeatDelay:400>bitflags:48|TRIG_LOW|RELEASED|LASTLVL_H|SOLOBTN –CMD_LISTS– -listidx=0- -listidx=1- listidx=1 idx=0 cmd=3 (typeString) data1=0(0x0) data2=0(0x0) data3=0(0x0) listidx=1 idx=1 cmd=2 (Keyboard) data1=49192(0xC028) data2=0(0x0) data3=0(0x0) listidx=1 idx=2 cmd=7 (currListIdx) data1=2(0x2) data2=0(0x0) data3=0(0x0) -listidx=2- listidx=2 idx=0 cmd=3 (typeString) data1=1(0x1) data2=0(0x0) data3=0(0x0) listidx=2 idx=1 cmd=2 (Keyboard) data1=49192(0xC028) data2=0(0x0) data3=0(0x0) listidx=2 idx=2 cmd=7 (currListIdx) data1=1(0x1) data2=0(0x0) data3=0(0x0) -listidx=3- -listidx=4- -listidx=5- -listidx=6- -listidx=7- –STRINGS– str0=Hello my friend! H72 e101 l108 l108 o111 32 m109 y121 32 f102 r114 i105 e101 n110 d100 !33 str1=Nice to meet you! N78 i105 c99 e101 32 t116 o111 32 m109 e101 e101 t116 32 y121 o111 u117 !33 done. —— This output shows all lists stored in internal EEPROM/permanent flash memory. The explaination of the sections above is as follows: —VARS–: this section shows all global button variables- isON=1 => is the USB in suspended/standby mode (reduced power) or Full-Power-ON mode?
- echo=1 => shall the serial input be output again (echo function) ?
- currListIdx=1 => the command list which is executed on next button trigger
- bsp=100 => the buttonStatePolling-interval. The time in milliseconds the updates its internal status. More information later.
- soloBtnIdx=-1 => when any button is configured as solo-button, its triggering exclusively. No other button can interfere. This is a feature of the USB Pushbox containing multiple buttons. The solo-button status can be set with the ‘physical-Pin-configuration / @-command’.
- keyb_layout: 1 – GERMAN_KEYB_LAYOUT_WINDOWS_CP1252 => the current layout used for typing strings. More information later.
Details on COMMAND_TYPEs
COMMAND_TYPE 1 (HID-SYSTEM-KEY): DATA1..3 can be set. c1; !1,0,1,0x82,0,0; s; This line will program the button as a Standby-Key. 0x82 = HID_SYSTEM_SLEEP. See chapter “System key codes (hex)” in our code list. Note: The button always executes command list 0 in Standby-Mode. If you want to wake-up your machine on second button press, program: c0; !0,0,1,0x83,0,0; s; Also notice that not all operating systems support all HID-SYSTEM commands. So you can also add the SLEEP/WAKE as HID-CONSUMER keys: !1,1,4,0×32,0,0;s; => CONSUMER sleep function (see COMMAND_TYPE 4 below for more information). Notice: We put this consumer command on row index 1, as on index 0 we programmed the HID-SYSTEM_SLEEP command before.COMMAND_TYPE 2 (HID-KEYBOARD-KEY = Standard Keyboard Function): DATA1..3 can be set. c1; !1,0,2,32,0×8000,0; !1,1,2,0x4028,0x8000,0; s; This line will program the operations: press SPACE (32), release last key (0x8000), press ENTER (0x4028), release last key (0x8000). See the code list for key-codes. Expert user notice: You can use USB-HID-RAW values (instead of ASCII values) for COMMAND_TYPE2 by binary-OR them with 0x4000 (i.e. the ENTER key in the example above). For all RAW codes please refer to the USB Organization HID usage table p.53ff.
COMMAND_TYPE 3 (TYPE-STRING = Type a word/several characters in sequence): DATA1..3 can be set. c1; str4=Hello World!; !1,0,3,4,0,0; s; If you trigger the button, it will type “Hello World!”. ‘strX=anymessage;’ stores your string in slot number 4. ‘s;’ will store it to flash memory. If you want to type another message on second button trigger, continue with the example for COMMAND_TYPE 7 (currListIdx).
COMMAND_TYPE 4 (HID-CONSUMER-KEY = special key): DATA1..3 can be set. c1; !1,0,4,0xE2,0,0; s; If you trigger the button, it will mute/unmute your system sound volume. According to the codes list 0xE2 = HID_CONSUMER_MUTE.
COMMAND_TYPE 5/6 (5=delay milliseconds/ 6=delay seconds): DATA1 must be set. c1; !1,0,6,3,0,0; !1,1,2,0×4028,0,0; s; If you trigger the button, it will wait 3 seconds. Then it will press RETURN/ENTER (=0x4028 according to the codes list) and auto-release after execution (default behaviour if no other commands follow).
COMMAND_TYPE 7 (setCurrListIdx = execute other list number on button press): DATA1 must be set. As default command list 1 is executed. We now change this execution list number dynamically. First we write a string in command list 1: c1; str4=Hello World!; !1,0,3,4,0,0; Press the button and see “Hello World!”. Now we change pin physical configuration of the button to enable the use of COMMAND_TYPE7 (setCurrListIdx): @1,19,2,0,127,-1,-1,400,500; This physical pin configuration will be explained in more details below. For us important is the 127 (1=default), which allows us to change the current command execution list index (=currListIdx) on button press/trigger. Now we send this line: !1,1,7,5,0,0; c5; str2=How are you?; !5,0,3,2,0,0; !5,1,7,1,0,0; s; Meaning of this line: On second button press, list number 5 is the default execution list (!1,1,7,5,0,0;). An additional string ‘How are you?’ is stored in string slot 2 (str2=…). And we type the stored string in command list number 5, index 0 (!5,0,3,2,0,0). Then we get back to command list number 1 (!5,1,7,1,0,0). Finally we save all settings to flash with “s;”.Press the button and see “Hello World!”, press it again and see “How are you?”. Next press again: “Hello World!”… and so forth. Important: As the command execution index can be changed, it is necessary to unplug- and replug the button to test the button function properly/ reset currListIdx to 1 (=startup value). Note: currListIdx will be also shown by typing the ask config command: ?;
COMMAND_TYPE 8 (set mouse cursor position and optionally click): DATA1..3 are used. Example: c1; !1,0,8,32256,256,1; Result: Left mouse button click in upper right corner / close window (please not that the close-windows function can be more reliable performed with the ALT-F4 keystroke in Windows). Syntax: ![list],[index],8, [x], [y], [buttonclick]; Screen coordinates range from 0..32768 for both x and y axis. The coordinates x=y=0 leave the cursor at the current position. ButtonClick: 0=no click; 1=left click; 2=right click; 4=middle click. To find the proper screen coordinate values, please see below for the button coordinate test. Important note for firmware >= 2.2.3: Older firmwares<=2.2.3 had problems with setting the mouse in Android and OS-X. From 2.2.3 “virtual screen coordinates” are used. They are given to the OS as relative movements. This means you have to try the x/y values between 0 and 2048 to set the cursor to a distinct position. These virtual coordinates are quite similiar to the physical screen coordinates. However they also depend on your OS mouse driver settings (especially the additonal acceleration on movement).
COMMAND_TYP 9 (String will be sent to integrated USB serial port ausgeben): DATA1 wird verwendet. Example: str0=Hello World!; c1; !1,0,9,2,0,0; s; Result: The string “Hello World!” will be sent to the USB serial port on button trigger.
Normally the button only executes a command list once and then waits for button release. But a typical computer keyboard repeats the function when the key/button is hold. You can also set this behaviour for your USB Pushbutton (not for USB Pushbox – it is also capable for repeat on hold, but has a different configuration for pin A0/18; more details in the next chapter). If you want to auto-repeat the key simulation while the button is pressed, enter this command in the serial terminal: @1,19,2,0,127,127,-1,400,500;s; If you wish to revert to the old/factory “single-shot-execution setting”, type: @1,19,2,0,127,-1,-1,400,500;s;
Button-sensitive function
The USB Pushbutton contains a NormallyConnected(NC)- and a NormallyOpen(NO)- switch. Both are physically connected. The NC is disabled and the NO is used as by default in the physical pin configuration. As the NC is more sensitive to trigger (the button does not need to be pushed as low as for the NO switch), you can enable the NC and disable the NO with this command line: @1,19,2,0,-1,-1,-1,400,500; @1,18,2,0,1,-1,-1,400,500;s; Test it to set how easy/early now the button triggers if you press it slightly down. Enter this line revert to original factory/settings: @1,19,2,0,127,-1,-1,400,500; @1,18,2,0,-1,-1,-1,400,500;s; More details on these values/how this works are explained as follows:Physical pin configuration: “@…”- command details
Each physical button connected to the internal electronic module can be configured by the user. The syntax of the physical pin configuration is as follows: @[listindex], [physPin], [pinmode], [bitflags], [listTrigger], [listRepeat], [listRelease], [repeatDelayMS], [treshold_1];- listindex: 0..3 – physical pins list index
- physPin: 18..21 (A0..A3)
- mode: always 2 (PULL_UP resistor) – Arduino pinMode setting
- bitflags: byte value bit0 (1): Shall the button trigger on LOW (0) or HIGH (1) pin level bit1 (2): STATUS: pin is triggered bit2 (4): STATUS: physical pin level has changed bit3 (8): STATUS: repetition/hold mode on bit4 (16): STATUS: last pin level bit5 (32): pin SOLO-mode ; if this bit is set and the button is triggered/pressed, no other pin can trigger a command list execution; so this pin triggers exclusively until it is released. bit6 (64): pin is in digitalMode (analogMode is default) – Note: set [treshold_1] to 0 when using pin in digitalMode. bit 7 (128): noAutoRelease. Set this bit, if you want to disable the AutoRelease-execution at the command list end. Then you can manually auto-release with the data value 0xFFFF in any command list.
- listTrigger: This command list will be executed when the button is triggered/pressed. -1 = disabled/no function. Set to 127 when CMDTYPE_7 (setCurrListIdx) is used.
- listRepeat: This command list will be executed when the button is in repetition/is hold. -1 = disabled/no function. Set to 127 when CMDTYPE_7 (setCurrListIdx) is used.
- listRelease: This command list will be executed when the button is released. -1 = disabled/no function. Set to 127 when CMDTYPE_7 (setCurrListIdx) is used.
- repeatDelayMS: This is the time in milliseconds after the button starts the listRepeat command list on button hold. Typ. 400ms.
- treshold_1: 0..1024 (0..5V) – generally the analog pins will be used. Therefore we can set the treshold for the logical HIGH-level. Typ. 500 (=2.5V).
// // phys-pin-A0-18 -> NC switch > GND ; on list -1=disabled // phys-pin-A1-19 -> NO switch->GND ; on list 1 // phys-pin-A2-20 not connected ; on list -1=disabled // phys-pin-A3-21 not connected ; on list -1=disabled Note: the pin-label ‘A0’..’A3′ printed on the electronic board are named pin 18..21 in the software configuration. So we have these default software pin configurations for the physical connections above: @0,18,2,1,-1,-1,-1,400,500; @1,19,2,0,127,-1,-1,400,500; @2,20,2,0,-1,-1,-1,400,500; @3,21,2,0,-1,-1,-1,400,500; s; => The USB Pushbutton NC switch is connected to pin18 and is disabled for all lists (-1,-1,-1). => The USB Pushbutton NO switch is connected to pin19 and is enabled for the default startup list index 1 and CMDTYPE_7 is allowed (127 in the configuriaton string above). You could also use simply 1 here (run command list 1), but then CMDTYPE_7 (set currListIdx) would not work. => The two other pins on the board are disabled.
Pin configuration examples
- Execute command list 1 on button press, execute command list 2 on button hold, execute command list 3 on button release: @1,19,2,0,1,-1,3,400,500; This example is quite useful when you have 3 different actions to operate in order. Example for a DJ sound break: 1.) button trigger => command list 1: mute volume 2.) button hold => do nothing 3.) button release => command list 3: unmute volume to old sound level
- Execute command list 1 on trigger and allow changing the currListIdx via CMDTYPE_7. @1,19,2,0,127,-1,-1,400,500; s; The button executes command list 1 (the default startup list) on first trigger and then (if a row with CMDTYPE_7 in the first command list is used) any other list on the follow up triggers.
ButtonStatePolling-Interval (bsp=xxx;)
The “bsp=xx” sets the ‘buttonStatePollingIntervall’ in milliseconds meaning the frequency the physical button states will be checked and any command list can be executed. The bsp is saved to internal EEPROM and reloaded on button plug-in. Default value for the bsp is 100ms, meaning the button status will be checked every 100ms and thus only every 100ms a command list can be executed. Example for a quite fast key repetition:- Execute default command list 1, allow changing the currListIdx via CMDTYPE_7 and repeat command list execution in 50ms steps (very fast): @1,19,2,0,127,127,-1,50,500; bsp=50; s;
Default pin configuration for “USB Pushbox”
// Multiple button setting: // phys-pin-A0 to NO switch->GND ; on list 1 enabled with SOLO-mode // phys-pin-A1 to NO switch->GND ; on list 2 enabled with SOLO-mode // phys-pin-A2 to NO switch->GND ; on list 3 enabled with SOLO-mode // phys-pin-A3 to NO switch->GND ; on list 4 enabled with SOLO-mode copy this line to serial terminal to set this pin configuration: @0,18,2,32,1,-1,-1,400,500; @1,19,2,32,2,-1,-1,400,500; @2,20,2,32,3,-1,-1,400,500; @3,21,2,32,4,-1,-1,400,500; s;Delays
Command executions can be delayed. Examples: !1,1,5,300,0,0; => wait 300 msec. in action list list number 1, row 1 (5=command ‘delayMicroseconds’) !1,2,6,3,0,0; => wait 3 sec. in action list number 1, row 2 (6=command ‘delaySeconds’)Mouse emulation
Example: c1; !1,0,8,32256,256,1; Result: Left mouse button click upper right corner / close window. Syntax: ![list],[index],8, [x], [y], [buttonclick]; Screen coordinates range from 0..32768 for both x and y axis. ButtonClick: 0=no click; 1=left click; 2=right click; 4=middle click Please not that the close-windows function can be more reliable performed with the ALT-F4 keystroke in Windows. It is more reliable to navigate with ALT and/or TAB and other keystrokes in Windows before using the mouse function, as Window positions can move. If you set X=0 and Y=0, the mouse cursor will not be re-positioned. Thus only clicking at the current cursor position is possible with X=0 and Y=0.Testing screen coordinates
As the screen coordinates from 0..32768 for the axis are a bit unusual, you can easily test them with the following commands:- mx+; => navigate x axis right – press the button to move
- mx-; => navigate x axis left – press the button to move
- my+; => navigate y axis down – press the button to move
- my-; => navigate y axis up – press the button to move
- ms+; / ms-; => make larger/smaller steps in x/y
- m0; => stop test mode
Standby-Mode
Command list 1 is executed by default when the computer is powered ON (‘List 1’) and command list 0 is executed when the computer is in Standby-Mode (‘List 0’). Note: The STANDBY and WAKE commands differ between Windows, Linux, OS-X and other operating systems (HID-SYSTEM/HID-CONSUMER type). Not every command is successful. So you should test the functions with a running serial terminal to get an operation feedback from the button.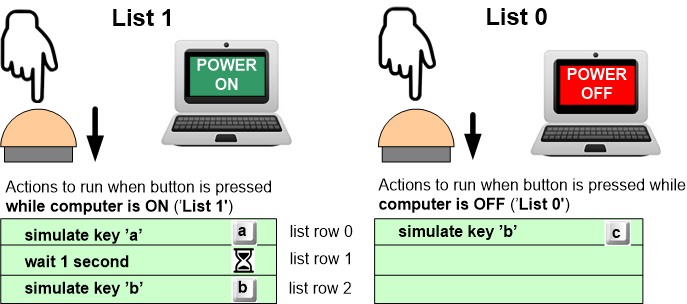
Keyboard layouts
For CMDTYPE_3 (typeSTRING) the keyboard layout is ‘English’ by default. If you want to use another keyboard layout, you have to enter the following command in terminal (and save with ‘s;’):l1; for German Windows CP1252 keyboard layout (set this for a German Windows OS). l0; for German DOS-Latin-1 keyboard layout. l2; for English keyboard layout (default setting)More keyboard layouts can bee added on request.
Firmware/ Factory settings
Please download the recent firmware for the USB Pushbutton or the USB Pushbox. After download unzip the file, attach the button and execute “Please click here…”. Note: Your settings (command lists, strings, pin configuration) will NOT be overwritten on firmware update. Factory default settings: You can connect the button to a serial terminal as described above and type in “factory;” to reset your button to factory default settings. The factory settings setup your button function to a single “ENTER” key without repetition on hold.More command examples
Clear you command list 1 with: ‘c1;’. Then choose your function: General Windows OS functions:- Open Windows Taskmanager (CTRL+SHIFT+ESC): !1,0,2,0×2000,0x2001,0x4029;
- Windows: cycle Windows (CTRL+ALT+ESC): !1,0,2,0×2000,0x2002,0x4029;
- three single ENTER (with instant release): !1,0,2,0xC028,0xC028,0xC028;
- left OS-Key (hold): !1,0,2,0×2003,0,0;
- Windows toggle desktop/app (OS-KEY + d): !1,0,2,0×2003,100,0;
- Windows logout (OS-Key + l): !1,0,2,0×2003,108,0;
- Windows open disk management (OS-KEY + r ; 500ms delay ; diskmgmt.msc ; ENTER): !1,0,2,0×2003,0x15,0x8000; !1,1,5,500,0,0; str0=diskmgmt.msc; !1,2,3,0,0,0; !1,3,2,0xC028,0,0;
- Windows open skype (OS-Key + r ; 500ms delay ; <skypePath> ; ENTER): !1,0,2,0×2003,0x15,0x8000; !1,1,5,500,0,0; str1=”C:\Program Files (x86)\Microsoft\Skype for Desktop\Skype.exe”; !1,2,3,1,0,0; !1,3,2,0×4028,0,0;
- HID System/Consumer sleep: !1,0,1,0×82,0,0; !1,1,4,0×32,0,0;
- HID System wake up: !0,0,1,0×83,0,0;
- HID System/Consumer powerdown: !1,0,1,0×81,0,0; !1,1,4,0×30,0,0;
- OS-X powerdown: !1,0,2,0×2000,0,0;!1,1,1,0×81,0xffff,0;!1,2,5,500,0,0;!1,3,2,0xC028,0,0;
- OS-X standby/wake: !1,0,2,0×2000,0x2001,0;!1,1,1,0×81,0,0;!1,2,7,0,0,0;!0,0,2,0×2000,0,0;!0,1,7,1,0,0;
- Open new window (CTRL-n): !1,0,2,0×2000,110,0;
- Open new tab (CTRL-t): !1,0,2,0×2000,116,0;
- Firefox re-open last tab (CTRL-SHIFT-t): !1,0,2,0×2000,0x2001,116;
- Toggle mute/unmute sound (1st/2nd trigger toogle): !1,0,4,0xE2,0,0;
- Sound pause on button hold/ DJ break function (mute on trigger, unmute on release): c1;c3; @1,19,2,0,1,-1,3,400,500; !1,0,4,0xE2,0,0; !3,0,4,0xE2,0,0;
- Play/replay sound with VLC: (OS-KEY + r; 500ms delay; VLC <soundpath>; ENTER; change command list to 2; Rewind in VLC with p ): !1,0,2,0×2003,0x15,0x8000; !1,1,5,500,0,0; str0=vlc “C:\Soundsamples\pushbutton.mp3”; !1,2,3,0,0,0; !1,3,2,0×4028,0,0; !1,4,7,2,0,0; !2,0,2,112,0,0;
- Volume step up/increase (with repetition on hold): !1,0,4,0xE9,0,0; @1,19,2,0,127,127,-1,400,500;
- Volume step down/decrease (with repetition on hold): !1,0,4,0xEA,0,0; @1,19,2,0,127,127,-1,400,500;
- SPACE-Key: !1,0,2,32,0,0;
- RETURN/ENTER: !1,0,2,0×4028,0,0;
- Arrow right: !1,0,2,0x404F,0,0;
- Arrow left: !1,0,2,0×4050,0,0;
- F5 to (re-)start presentation: !1,0,2,0x403E,0,0;
- Shift-F5 to start presentation from current slide: !1,0,2,0×2001,0x403E,0;
- Toggle two words: c1;c2; @1,19,2,0,127,-1,-1,400,500; str0=Hello my friend!; !1,0,3,0,0,0; !1,1,2,0xC028,0,0; !1,2,7,2,0,0; str1=Nice to meet you!; !2,0,3,1,0,0; !2,1,2,0xC028,0,0; !2,2,7,1,0,0;