
Video Repair Tool – Frequently Asked Questions (FAQ)
Question: Do you have any help videos?
Answer:
Question: Where can I find the Mac executable? Answer: Download and extract the .zip file on your Mac, then you can find the Mac executable – do not extract on the PC if using a Mac (Step-By-Step-Video for MacOS)
Question: When I try to start the program it says ‘missing script file’? Answer: First reason: This happens if the .zip archive has not been extracted (or not extracted properly). Right-click the .zip archive in Explorer (PC) or Finder (Mac), and choose ‘Extract all…’. Then go into the extracted folder (videorepair), and double-click the file ‘gs.exe’. Important note for Windows 10 or higher: You may have to allow run (right-click on executable->Properties->allow) (also see the Step-By-Step-Video for PC/Windows) Second reason: This happens due to MacOS malware checking. Solution: Right-click the file ‘mac_start’ and choose ‘Open With…->Terminal’. (Step-By-Step-Video for MacOS Sierra) Alternatively, on the Mac, right-click the file ‘gs‘, and choose ‘Show Package Contents‘, then double-click ‘Contents‘ folder, double-click ‘MacOS‘ folder, and double-click ‘gs‘ to start the executable.
Question: The software won’t accept the registration code. Answer: If you are not running the program as administrator on Windows and then try to register the program and it does not work, please try running the program as administrator.
Question: The DEMO repair did work, but now it doesn’t repair anymore? Answer: First reason: Ensure there is enough free space on your media for the new repaired file. It’s recommended to perform the repair on a hard disk with enough free space, so copy your damaged movie and reference movie to your hard disk before and then run the repair. Second reason: Your media has become corrupted after your first repair. It’s recommended to make copies of a damaged media before trying the repair.
of a damaged media before trying the repair.
Question: I can preview the repaired video using the program – where can I find the repaired movie file? Answer: The program creates a new folder (‘repaired’) within the same folder as your broken input video, this is called the ‘output folder’. You can find the name of output folder in the software user interface.
Question: The repaired video sometimes stops while being played back – Why? Answer: The program also tries to recover playback frame order information (playback frame order) – this doesn’t work perfectly with all video types. Try to switch off the feature: Unter ‘Options’, enter ‘-noctts’ in custom repair parameters.
Question: The repair doesn’t work properly on some files – why? Answer: There can be several reasons why a repair doesn’t work properly: a) Your media (SD card etc.) containing your movie is physically damaged, and if you try to copy the file off the media, it will not work, or it will not copy all your data, or it will no longer work. Media damages typically grow over time! There’s no chance to repair. b) Your media containing your movie is logically damaged (corrupt) – similar problem as in a). c) Your camera is not properly supported yet – please check this by reading the section further above.
Question: Your demo agreement states that the video recovered is only half size. Does that mean that a 2 minute video is only saved 1 minute of it? Answer: Yes, correct. A movie file is saved half size only in demo mode – For example, if a 100 MB movie is saved in demo mode, the full version will save 200 MB. Note that although the full version will save the other 50%, it does not mean that the other 50% will properly play. In some cases the remaining 50% may be too corrupt and -although saved- cannot be played back. Also, in other cases, the media can be too corrupt and a 2nd, 3rd, 4th etc. scan does *not* give the same results as the 1st scan! (That’s the reason why It is highly recommended to save your corrupt file to a non-corrupt media before running the repair on it!) .
Question: The DEMO version seems to repair with some issues – is this because it is a DEMO version? Answer: There’s no difference between DEMO and FULL version except the movie length. If there’s a problem repairing the movie using the DEMO version, it will exist in the FULL version too. That’s due to the nature of movie repairs.
Question: After purchasing the program doesn’t seem to work anymore. Help! Answer: This can happen if your computer hard disk or the file system is corrupt or damaged since the first run. Try redownloading the program on another hard disk: 1. Redownload and extract the program. 2. Copy the file ‘lic’ from your old program folder into the newly created program folder.
Question: I tested your software on a corrupted video and it looks great, it’s not choppy … just the voice does not match with the video … can this be fixed? Answer: This cannot be solved automatically by a piece of software yet and would need a manual repair. The reason is that due to the corruption, pieces of audio or video portions are missing in the movie and that will make them out of sync. Only a human can bring them into sync manually. We are working on a solution (which might work semi-automatic), but for now our software cannot fix this. One solution for now would be to open the repaired movie into a video editor and split the audio track, and move the splitted parts around, until they match to the video track.
Question: On my video files, the full version seem to repair only 50% as the demo version – Why can this happen? Answer: In some cases it can happen that the video file does not contain 100% of video data. Sometimes, it only contains 50%, sometimes even less. This fully depends on the type of data loss of your video file. In such a case, the full version can only repair any valid video data, and nothing more. The log file will indicate this (it will not find any video data after a certain file offset).
Question: When I try to start the repair, the program it says ‘cannot write to output folder’? Answer: This happens if the program cannot write to the output folder. 1. Make sure your user account has sufficient rights to write to the output folder. 2. Make sure no other running instances of the program are running. Press ‘CTRL+SHIFT+ESC’ to open the task manager, and close any processes named ‘movdump.exe’ or ‘gs.exe’. 3. Try to choose another output folder (under Options). 4. Restart your computer, and try again.
Question: When I repair a movie larger than 2 GB, it seems to stop at 2GB. Answer: This might be possible (we are still analysing this problem). As a temporary workaround, extract this filesplitter tool to your hard disk, start it, choose your movie file, and press on ‘Split’ to split the movie into several 2 GB packets. The smaller packets will be stored into the same folder as your movie file. Finally, run the repair on the smaller packets.
Question: When I preview the repaired file, the voice is off. However, when I look at a saved file it is perfect – Why? Answer: This might be possible. The preview uses an internal player, if that player might not understand the audio format of your camera. If your own player plays the audio, that’s fine.
Question: ‘gs.exe has stopped working.’ If you get a message ‘gs.exe has stopped working. A problem caused the program to stop working correctly. Windows will close the program and notify you is a solution is available’, it indicates that your reference movie is broken too (or contains invalid meta data). Try to choose another working reference movie.
Question: Can I repair a complete media (for example, SD card) with the program? Answer: Yes. First generate an ‘image file’ for your media (e.g. using a recovery program). Then use that image file as ‘input movie’ in the repair program like you would choose a movie file. The type of input media (movie file, media image file) does not matter! 1. Download a disk imaging tool (https://main.grauonline.de/?page_id=8) 2. Start it, choose your disk/volume. 3. Press ‘Create Image file’ to create the disk image file. 4. After completion, run video repair tool, and choose the created disk image file (C:test.img) as input movie. Choose a good reference movie. Then run the scan.
Question: I notice that when I want to preview the file in your program the repaired movie plays fine but when I open the repaired movie in Quicktime/Media Player the audio is missing and or the video is pixilated and jumpy. What is the solution to the problem? Why can your player view fine and an outside program not? Answer: The reason for this is that there are actually two stages involved: 1. Repair and 2. Reencode Repair is what the program does by default (fixing the “file table” of the movie). Although repaired, the movie can have encoding issues. Some players (VLC, mplayer, our built-in player) are so intelligent that they can fix encoding issues “on-the-fly” during playback. Some players can’t do this (Windows Media player / QuickTime player). Solution: There’s an reencoding option built into the repair program (Options->Checkbox Reencode repaired movie files) that will instruct the program to run the 2nd stage (Reencode) after the repair stage. This should fix the issue with external players in most cases. Please note that we cannot give a guarantee that this will work in all cases – it just works in most cases.
Question: This software seems to be very expensive. Answer: It might look expensive, however we are working a very long time on this software and that needs to be financed. I have not seen any other software that can repair like our software can. This is kind of rocket science and that’s kind of expensive.
Question: Can you add my (HD) digital video camera model or video format to the repair software? Answer: Yes, some cameras are being added soon (we are working on them), some may still be missing – Please see further above for details.
Question: I have an MPEG-4/H264 .ts file recorded by a digital video recorder (DVR) – How can I play such file on a PC/Mac or make it DVD-compatible? Answer: You do not need a repair tool for this, just a converter that will convert your MPEG-4/H264 .ts file into a .mp4 or .mpg file – Follow these steps:
Question: My movie files are lost. I do not have any broken/damaged video files. How can I recover my lost movies from a flash media card or hard disk? Answer: You need to use a data recovery software before. A data recovery software can recover lost and deleted video files. After your movie files have been recovered, they won’t play in your media player in some cases. In such a case, you can use this repair software. However, you will need to use a data recovery software before to recover your movie files.
Question: After repairing a movie with wrong file extension (e.g. .MDT), the repaired movie has still a wrong file extension – How to fix this? Answer: In Mac Finder, simply rename the repaired .mdt file into .mov and it will be fine (see help video). And on Windows Explorer, simply rename the repaired .mdt file into .mov and you it will be fine (see help video).
 Codec
A codec is an algorithm (in the player software) that can decode/encode a certain video or audio format – common codecs used in QuickTime files (.mov/.mp4) are:
– Apple Intermediate Codec (‘icod’)
– MPEG-4 (‘mp4v’)
– MPEG-4 AVC (‘avc1’)
– MPEG-4 AAC (‘mp4a’)
– MPEG-2 (‘xdvc’)
– PCM: Big Endian (‘twos’) and Little Endian (‘sowt’)
Codec
A codec is an algorithm (in the player software) that can decode/encode a certain video or audio format – common codecs used in QuickTime files (.mov/.mp4) are:
– Apple Intermediate Codec (‘icod’)
– MPEG-4 (‘mp4v’)
– MPEG-4 AVC (‘avc1’)
– MPEG-4 AAC (‘mp4a’)
– MPEG-2 (‘xdvc’)
– PCM: Big Endian (‘twos’) and Little Endian (‘sowt’)
How does the repair work? 1. The overall problem to be solved is finding the video and audio chunks in damaged and corrupt movie files. The video repair utility we developed, scans the movie (e.g. a .MP4 file) for video and audio chunks, tries to guess if a chunk is video or audio and so extracts all video and audio chunks for a new repaired movie. This tool doesn’t depend on any valid or correct container format – it fully automatically can extract the video and audio streams without a valid container. 2. Finally, the tool saves the chunks (audio and video streams) to a new movie file, and so adds a new QuickTime container to them. The result is that the video (and the audio) can be played back again. If there was any raw video or audio data in the file, it can be stored into a new playable movie file.
Question: What is the difference between MPEG-4 and .MP4 ? Answer: MPEG-4 is a global multimedia standard, delivering professional-quality audio and video streams over a wide range of bandwidths, from cell phone to broadband. The MPEG-4 standard is receiving tremendous support by many of the premiere internet content providers and other industries. For example, H.264 video, also known as MPEG-4 part 10, has beeen adopted by the ISO MPEG allowing to create ISO-complaint H.264 video in a .MP4 file. So, MPEG-4 is a standard describing the video encoding format – Unlike .MP4 which is a file format describing how such video data is stored in a file on a disk.
Question: When played back, the repaired video is shaky with some players, and with others not – why? Answer: Some video packets in your video file may contain ‘gaps’ with unused data. The gaps are not detected during the repair. Some players ignore some (e.g. mplayer), some players try to decode them (QuickTime), and this may produce a shaky playback. Solution: Reencode the repaired movie files to remove the gaps. 1. Enable ‘reencode movie files’ under Options. 2. Choose ‘Custom (ffmpeg) as ‘preset for reencoding’ 3. Enter ‘mp4: -f mov -acodec copy -vcodec mpeg2video -sameq’ into ‘custom reencoder params’
Question: What is Apple Intermediate Codec (AIC)? Answer: The Apple Intermediate Codec is a video codec designed by Apple, Inc. to be an intermediate format in an HDV workflow. AIC does not use temporal compression, every frame can be decoded without the other frames. It is primarily used in Final Cut Studio and iMovie.
Question: How can I change the folder location for the license file? Answer: Change the home folder variable (‘GSHOME’): Mac: export GSHOME=/somePath PC: set GSHOME=C:somePath
Question: Could you give me a summary of the options? Answer: Those are very technical, so we can only give technical answers 🙂 Custom repair parameters:
Frames per second: use ‘auto’ to use frame rate of reference file, to overwrite enter a number (for example 29.97)
Overwrite existing codec information by reference file: activate this if your broken movie may contain invalid codec information, and the reference file codec information should be used instead.
Detect new movie clips: For each ‘mdat’ atom found, it will start a new file (experimental).
Enable entropy scan: When disabled, the entropy scan shown in the repair report is skipped – if disabled, the scan is just faster but there’s less information about the file then in the repair report.
Enable PCM detection: When enabled, tries to detect audio PCM samples by ‘brute-force’ (experimental) – do not activate, unless you need PCM codec samples.
Enable AAC detection: When enables, tries to detect AAC samples by ‘brute-force’ (experimental) – do not activate, unless you need to detect AAC codec samples by ‘brute-force’.
Save raw video+audio streams to files: When enabled, saves raw video and audio data to files – You need special video and audio editing programs to import those data and to merge audio and video streams manually.
Reencode repaired movie files: Reencodes repaired movie files by some encoder program (ffmpeg or mencode).
Enable logging: When disabled, does not create log files.
Overwrite existing codec information by reference file: When enabled, it will always overwrite any found codec information of the input file by codec information of the reference file. Do not activate unless you know that your input file has a wrong codec information.
- Software introduction
- How to download, extract and start (PC/Windows)
- How to download, extract and start (Mac OS X)
- How to download and start (MacOS Sierra)
- How to move app to Mac OS X Applications folder
Question: Where can I find the Mac executable? Answer: Download and extract the .zip file on your Mac, then you can find the Mac executable – do not extract on the PC if using a Mac (Step-By-Step-Video for MacOS)
Question: When I try to start the program it says ‘missing script file’? Answer: First reason: This happens if the .zip archive has not been extracted (or not extracted properly). Right-click the .zip archive in Explorer (PC) or Finder (Mac), and choose ‘Extract all…’. Then go into the extracted folder (videorepair), and double-click the file ‘gs.exe’. Important note for Windows 10 or higher: You may have to allow run (right-click on executable->Properties->allow) (also see the Step-By-Step-Video for PC/Windows) Second reason: This happens due to MacOS malware checking. Solution: Right-click the file ‘mac_start’ and choose ‘Open With…->Terminal’. (Step-By-Step-Video for MacOS Sierra) Alternatively, on the Mac, right-click the file ‘gs‘, and choose ‘Show Package Contents‘, then double-click ‘Contents‘ folder, double-click ‘MacOS‘ folder, and double-click ‘gs‘ to start the executable.
Question: The software won’t accept the registration code. Answer: If you are not running the program as administrator on Windows and then try to register the program and it does not work, please try running the program as administrator.
Question: The DEMO repair did work, but now it doesn’t repair anymore? Answer: First reason: Ensure there is enough free space on your media for the new repaired file. It’s recommended to perform the repair on a hard disk with enough free space, so copy your damaged movie and reference movie to your hard disk before and then run the repair. Second reason: Your media has become corrupted after your first repair. It’s recommended to make copies of a damaged media before trying the repair.
of a damaged media before trying the repair.
Question: I can preview the repaired video using the program – where can I find the repaired movie file? Answer: The program creates a new folder (‘repaired’) within the same folder as your broken input video, this is called the ‘output folder’. You can find the name of output folder in the software user interface.
Question: The repaired video sometimes stops while being played back – Why? Answer: The program also tries to recover playback frame order information (playback frame order) – this doesn’t work perfectly with all video types. Try to switch off the feature: Unter ‘Options’, enter ‘-noctts’ in custom repair parameters.
Question: The repair doesn’t work properly on some files – why? Answer: There can be several reasons why a repair doesn’t work properly: a) Your media (SD card etc.) containing your movie is physically damaged, and if you try to copy the file off the media, it will not work, or it will not copy all your data, or it will no longer work. Media damages typically grow over time! There’s no chance to repair. b) Your media containing your movie is logically damaged (corrupt) – similar problem as in a). c) Your camera is not properly supported yet – please check this by reading the section further above.
Question: Your demo agreement states that the video recovered is only half size. Does that mean that a 2 minute video is only saved 1 minute of it? Answer: Yes, correct. A movie file is saved half size only in demo mode – For example, if a 100 MB movie is saved in demo mode, the full version will save 200 MB. Note that although the full version will save the other 50%, it does not mean that the other 50% will properly play. In some cases the remaining 50% may be too corrupt and -although saved- cannot be played back. Also, in other cases, the media can be too corrupt and a 2nd, 3rd, 4th etc. scan does *not* give the same results as the 1st scan! (That’s the reason why It is highly recommended to save your corrupt file to a non-corrupt media before running the repair on it!) .
Question: The DEMO version seems to repair with some issues – is this because it is a DEMO version? Answer: There’s no difference between DEMO and FULL version except the movie length. If there’s a problem repairing the movie using the DEMO version, it will exist in the FULL version too. That’s due to the nature of movie repairs.
Question: After purchasing the program doesn’t seem to work anymore. Help! Answer: This can happen if your computer hard disk or the file system is corrupt or damaged since the first run. Try redownloading the program on another hard disk: 1. Redownload and extract the program. 2. Copy the file ‘lic’ from your old program folder into the newly created program folder.
Question: I tested your software on a corrupted video and it looks great, it’s not choppy … just the voice does not match with the video … can this be fixed? Answer: This cannot be solved automatically by a piece of software yet and would need a manual repair. The reason is that due to the corruption, pieces of audio or video portions are missing in the movie and that will make them out of sync. Only a human can bring them into sync manually. We are working on a solution (which might work semi-automatic), but for now our software cannot fix this. One solution for now would be to open the repaired movie into a video editor and split the audio track, and move the splitted parts around, until they match to the video track.
Question: On my video files, the full version seem to repair only 50% as the demo version – Why can this happen? Answer: In some cases it can happen that the video file does not contain 100% of video data. Sometimes, it only contains 50%, sometimes even less. This fully depends on the type of data loss of your video file. In such a case, the full version can only repair any valid video data, and nothing more. The log file will indicate this (it will not find any video data after a certain file offset).
Question: When I try to start the repair, the program it says ‘cannot write to output folder’? Answer: This happens if the program cannot write to the output folder. 1. Make sure your user account has sufficient rights to write to the output folder. 2. Make sure no other running instances of the program are running. Press ‘CTRL+SHIFT+ESC’ to open the task manager, and close any processes named ‘movdump.exe’ or ‘gs.exe’. 3. Try to choose another output folder (under Options). 4. Restart your computer, and try again.
Question: When I repair a movie larger than 2 GB, it seems to stop at 2GB. Answer: This might be possible (we are still analysing this problem). As a temporary workaround, extract this filesplitter tool to your hard disk, start it, choose your movie file, and press on ‘Split’ to split the movie into several 2 GB packets. The smaller packets will be stored into the same folder as your movie file. Finally, run the repair on the smaller packets.
Question: When I preview the repaired file, the voice is off. However, when I look at a saved file it is perfect – Why? Answer: This might be possible. The preview uses an internal player, if that player might not understand the audio format of your camera. If your own player plays the audio, that’s fine.
Question: ‘gs.exe has stopped working.’ If you get a message ‘gs.exe has stopped working. A problem caused the program to stop working correctly. Windows will close the program and notify you is a solution is available’, it indicates that your reference movie is broken too (or contains invalid meta data). Try to choose another working reference movie.
Question: Can I repair a complete media (for example, SD card) with the program? Answer: Yes. First generate an ‘image file’ for your media (e.g. using a recovery program). Then use that image file as ‘input movie’ in the repair program like you would choose a movie file. The type of input media (movie file, media image file) does not matter! 1. Download a disk imaging tool (https://main.grauonline.de/?page_id=8) 2. Start it, choose your disk/volume. 3. Press ‘Create Image file’ to create the disk image file. 4. After completion, run video repair tool, and choose the created disk image file (C:test.img) as input movie. Choose a good reference movie. Then run the scan.
Question: I notice that when I want to preview the file in your program the repaired movie plays fine but when I open the repaired movie in Quicktime/Media Player the audio is missing and or the video is pixilated and jumpy. What is the solution to the problem? Why can your player view fine and an outside program not? Answer: The reason for this is that there are actually two stages involved: 1. Repair and 2. Reencode Repair is what the program does by default (fixing the “file table” of the movie). Although repaired, the movie can have encoding issues. Some players (VLC, mplayer, our built-in player) are so intelligent that they can fix encoding issues “on-the-fly” during playback. Some players can’t do this (Windows Media player / QuickTime player). Solution: There’s an reencoding option built into the repair program (Options->Checkbox Reencode repaired movie files) that will instruct the program to run the 2nd stage (Reencode) after the repair stage. This should fix the issue with external players in most cases. Please note that we cannot give a guarantee that this will work in all cases – it just works in most cases.
Question: This software seems to be very expensive. Answer: It might look expensive, however we are working a very long time on this software and that needs to be financed. I have not seen any other software that can repair like our software can. This is kind of rocket science and that’s kind of expensive.
Question: Can you add my (HD) digital video camera model or video format to the repair software? Answer: Yes, some cameras are being added soon (we are working on them), some may still be missing – Please see further above for details.
Question: I have an MPEG-4/H264 .ts file recorded by a digital video recorder (DVR) – How can I play such file on a PC/Mac or make it DVD-compatible? Answer: You do not need a repair tool for this, just a converter that will convert your MPEG-4/H264 .ts file into a .mp4 or .mpg file – Follow these steps:
- Download this video conversion tool (both Win and Mac) and extract it on your hard disk.
- Copy your .ts file into the input folder and rename it to ‘1.ts’.
- To convert your .ts file into a .mp4 file (for computer playback): Double-click on ‘win_make_mp4’ (PC) or ‘mac_make_mp4’ (Mac). -OR- To convert your .ts file into a .mpg file (for DVD playback): Double-click on ‘win_make_dvd’ (PC) or ‘mac_make_dvd’ (Mac).
- Wait until the console window disappears or the console output stops. If you want just try out the conversion for the first seconds on your file, you can press ‘q’ on the keyboard and the conversion will stop immediately.
- You’ll find the converted file in the output folder.
Question: My movie files are lost. I do not have any broken/damaged video files. How can I recover my lost movies from a flash media card or hard disk? Answer: You need to use a data recovery software before. A data recovery software can recover lost and deleted video files. After your movie files have been recovered, they won’t play in your media player in some cases. In such a case, you can use this repair software. However, you will need to use a data recovery software before to recover your movie files.
Question: After repairing a movie with wrong file extension (e.g. .MDT), the repaired movie has still a wrong file extension – How to fix this? Answer: In Mac Finder, simply rename the repaired .mdt file into .mov and it will be fine (see help video). And on Windows Explorer, simply rename the repaired .mdt file into .mov and you it will be fine (see help video).
Question: Why can we repair files that others cannot repair?
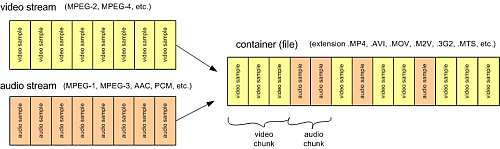
Answer: Specific problems require specific solutions. For each new camera, we examine it’s format and develop a new repair module. Some cameras share a common format, however for the repair of new formats, it is necessary to look closer at the camera format. On a top-view, all camera formats share some common principles: Encoding When a video camera records a movie, the audio and video stream data of the movie is encoded in a certain format, also called video encoding and audio encoding. Typical video encodings are MPEG-2, MPEG-4, Apple Intermediate, typical audio encodings are MPEG-1, MPEG-3, AAC and PCM. Container file Both video and audio stream data is stored in interleaved chunks to the movie file, and the data in the file alternates between video and audio all the time. Because the movie file contains both video and audio chunks, it is called a container. Typical container formats are QuickTime MOV or Microsoft AVI.
Codec
A codec is an algorithm (in the player software) that can decode/encode a certain video or audio format – common codecs used in QuickTime files (.mov/.mp4) are:
– Apple Intermediate Codec (‘icod’)
– MPEG-4 (‘mp4v’)
– MPEG-4 AVC (‘avc1’)
– MPEG-4 AAC (‘mp4a’)
– MPEG-2 (‘xdvc’)
– PCM: Big Endian (‘twos’) and Little Endian (‘sowt’)
How does the repair work? 1. The overall problem to be solved is finding the video and audio chunks in damaged and corrupt movie files. The video repair utility we developed, scans the movie (e.g. a .MP4 file) for video and audio chunks, tries to guess if a chunk is video or audio and so extracts all video and audio chunks for a new repaired movie. This tool doesn’t depend on any valid or correct container format – it fully automatically can extract the video and audio streams without a valid container. 2. Finally, the tool saves the chunks (audio and video streams) to a new movie file, and so adds a new QuickTime container to them. The result is that the video (and the audio) can be played back again. If there was any raw video or audio data in the file, it can be stored into a new playable movie file.
Question: What is the difference between MPEG-4 and .MP4 ? Answer: MPEG-4 is a global multimedia standard, delivering professional-quality audio and video streams over a wide range of bandwidths, from cell phone to broadband. The MPEG-4 standard is receiving tremendous support by many of the premiere internet content providers and other industries. For example, H.264 video, also known as MPEG-4 part 10, has beeen adopted by the ISO MPEG allowing to create ISO-complaint H.264 video in a .MP4 file. So, MPEG-4 is a standard describing the video encoding format – Unlike .MP4 which is a file format describing how such video data is stored in a file on a disk.
Question: When played back, the repaired video is shaky with some players, and with others not – why? Answer: Some video packets in your video file may contain ‘gaps’ with unused data. The gaps are not detected during the repair. Some players ignore some (e.g. mplayer), some players try to decode them (QuickTime), and this may produce a shaky playback. Solution: Reencode the repaired movie files to remove the gaps. 1. Enable ‘reencode movie files’ under Options. 2. Choose ‘Custom (ffmpeg) as ‘preset for reencoding’ 3. Enter ‘mp4: -f mov -acodec copy -vcodec mpeg2video -sameq’ into ‘custom reencoder params’
Question: What is Apple Intermediate Codec (AIC)? Answer: The Apple Intermediate Codec is a video codec designed by Apple, Inc. to be an intermediate format in an HDV workflow. AIC does not use temporal compression, every frame can be decoded without the other frames. It is primarily used in Final Cut Studio and iMovie.
Question: How can I change the folder location for the license file? Answer: Change the home folder variable (‘GSHOME’): Mac: export GSHOME=/somePath PC: set GSHOME=C:somePath
Question: Could you give me a summary of the options? Answer: Those are very technical, so we can only give technical answers 🙂 Custom repair parameters:
| Parameter | Notes |
|---|---|
| -qtrc | Experimental: Tries to repair based on found QT container table fragments |
| -single | Experimental: Repair special H264 camera recording footprints (Samsung etc.) |